Tracking a HAB using The Things Network using LoRaWAN and LMIC-node
September 16, 2023
Image source: a wonderful creation by Dall-E
I’ve recently written about my learning experience with LoRa, and sending data over long range radio for the purposes of tracking a high altitude balloon (HAB). I’ve previously focused on transmissions between a transmitter and a home made gateway and also point to point transmissions with just two LoRa transcievers. Those are both great ways of tracking a HAB, but there’s one more way I want to document, which is the use of LoRaWAN - more specifically, The Things Network.
What is The Things Network?
The Things Network (TTN) is a global network of LoRa gateways connected to the internet, which listen for LoRa radio transmissions and forward the received data to TTN servers. TTN implements LoRaWAN, which is a networking protocol. In order to have TTN gateways process the data, the transmitting device must be registered on TTN, which allows the data to be received securely, and forwarded to the relevant dashboard of the sending account. Essentially this means that as a sender who has registered my device on my TTN dashboard, I can use the whole TTN network to track my balloon, as long as my transmission data contains the balloon GPS coordinates.
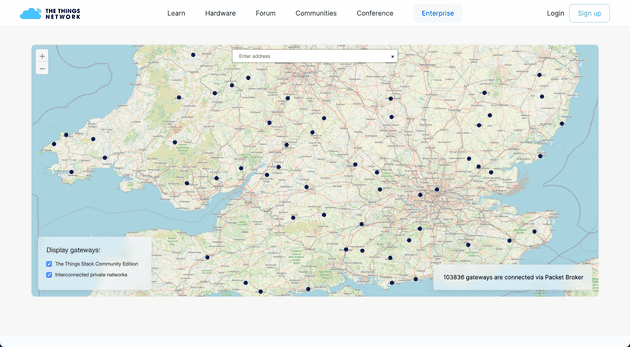
TTN has a load of gateways ready to help with this, as shown on the map:
I just want to say right off the bat, that although this approach has been used for HAB projects before and there has been specific software developed for TTN HAB tracking, it’s still not considered a great approach for HAB tracking. I posted a question on the Arduino Forum about this, which received a helpful response from a well-known LoRa guru, who informed me that as the balloon is so far away and the config on the transmitter will likely be designed for maximum distance (for effective tracking), the transmission will be spamming TTN. There is a fair usage policy in place at TTN, so it’s worth checking that out before considering this as a viable approach. For me, this method of tracking is very much a secondary method.
Using a TTN gateway
Although there is wide coverage of TTN gateways around the world, it’s still hit and miss whether you’re in range of one for experimenting. It used to be possible to create your own home made gateway using the cheap modules such as the RFM95/98 which have the SX1276 chip, however since the introduction of The Things Network V3 this is no longer possible. All gateways listening on behalf of TTN must have specific capabilities which make them a little more expensive than they used to be.
If you want to experiment and don’t have your own gateway, you can check out the map, find the nearest gateway to you, and head to a nearby pub or cafe to give it a go.
How to communicate with the LoRaWAN network
Sending LoRa point to point data, or even data to your own home (non-LoRaWAN gateway), is relatively more simple than LoRaWAN because LoRaWAN has limitations and rules which simple point-to-point LoRa just doesn’t have. You can’t send any old data to TTN network because the TTN gateways are listening for a specific credentials to be sent along with the data, and the data to be in a certain format.
Registering a device on The Things Network
The first step is to register your LoRa sending device on the TTN dashboard.
A side note that I’m using a RFM95 device, which runs 868MHz frequency. At time of writing, RFM98 (433MHz) is not supported by TTN.
Head to the getting started area and select to join the community edition. When signed up you can choose between viewing applications or gateways. Select applications and create an application.
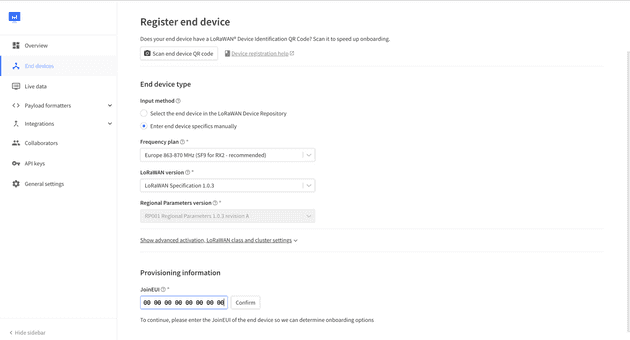
With an application created, you can proceed to register a device. Select your frequency plan, and the LoRaWAN specification, which corresponds to the capabilities of your LoRa device. For the RFM95 I’m using, the specification 1.0.3 should be selected.
For the JoinEUI, you may or may not know this. For the smaller RFM modules, you can go ahead and just fill in with all 0’s:
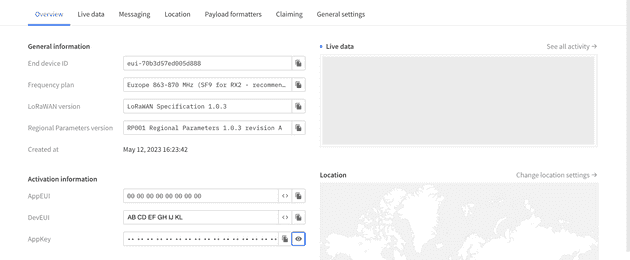
Once registered, the new device will have a section containing an AppEUI, DevEUI, and AppKey:
These keys are later added to our code which powers the sending LoRa device for validating the transmission which is received by TTN. As these keys are registered to my account, TTN knows that an incoming transmission signed with these keys are for me, and are forward to my account.
Sending a LoRaWAN transmission for TTN using LMIC-node
Sending the transmission in the valid format expected by TTN is not a trivial task. There are a load of libraries which help make this process easier, and they are definitely worth using. There’s a helpful forum post here which lists some of the popular libraries. It’s also worth doing a filtered GitHub search too as it’s good to see which are most actively developed.
The rest of this post will use the only library I’ve tried, which is LMIC-node, however at the time of writing this post I noticed the other more popular library, arduino-lorawan has had a spurt of development after a year of no activity, so it may be worth checking that out too.
LMIC-node is not really a library - it’s more of a starter project which is designed to be built upon. It also must be used with PlatformIO.
Start by cloning the repo:
git clone https://github.com/lnlp/LMIC-node.gitAlthough there are a load of files and a lot of code, there’s only really four files you’ll likely need to work with.
lorawan-keys.h
Firstly, head to keyfiles/lorawan-keys_example.h and copy that to a new file, keyfiles/lorawan-keys.h. This file will contain the credentials we created earlier when signing up and registering the device. The section we are concerned with is for OTTA (Over The Air Activation).
If you’re registering a RFM9x module, just leave the OTAA_APPEUI as all zero hex bytes (0x00).
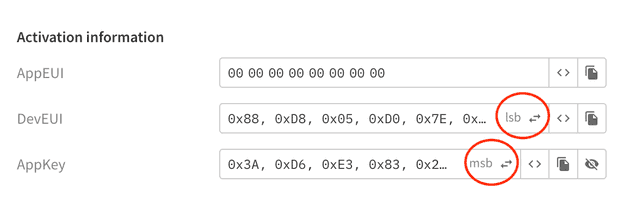
The OTAA_DEVEUI (in lsb format) and OTAA_APPKEY (in msb format) should be obtained from the dashboard when we registered the device. Be sure to copy the values in the correct format, which can be done easily by selecting the options in the UI:
platform.ini
With the keys updated, head to platform.ini. In this file, you simply uncomment the board you’re using. I’m using an ESP32 WROOM board, which is of the NodeMCU family:
bsf_*
Then head to the src/boards/bsf_* to take note of the device wiring pin table - ensure your board and LoRa module are wired correctly to the correct SPI pins. Some of the ESP32 boards, for example, have 3 sets of SPI pins, but only one will work.
LMIC-node.h
Finally, open src/LMIC-node.h which contains the main part of the app. Although there’s a fair amount of code in this file, only a small part of it really needs to be edited to get a basic transmission working.
One thing worth pointing out is that you can update the initLmic() function to increase the spread factor and power - for example:
initLmic(1, DR_SF12, 18);This will help get a little more range if you’re far from your nearest gateway, however as explained in this issue, the SF and other configuration on the device is updated by the TTN server after the initial connection.
Viewing the LMIC-node transmission in TTN dashboard
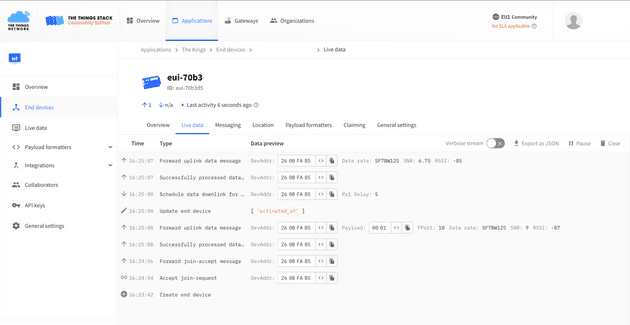
With LMIC-node configured, you can load it onto a board and, providing you’re within a couple of kilometers of a TTN gateway, you should start to see some activity on your dashboard. This will start with a Accept join-request followed by Forward join-accept message. This is the initial connection request, which the TTN uses to check the credentials and validate our device.
If the connection request fails, you may receive a message like ”Join-request to cluster-local Join server failed MIC mismatch”. If this happens, be sure to double check the values in the keys file. This happened to me because I had copied the
AppKeyas lsb format instead of msb format.
I encountered another problem where I would get stuck in a loop of “accept join-request” and “forward join-accept message”. This seemed to happen when I was trying to connect to a gateway at a university near my house, which I suspect had security in place to stop my request. I also got this problem when trying to connect to a different gateway but it resolved when I got within a decent range of the gateway.
It’s also worth noting that even if a device has had the initial connection accepted and the payloads are being sent through to TTN, once the transmitting device restarts or is woken up from a deep sleep, it will need to perform the connection verification again.
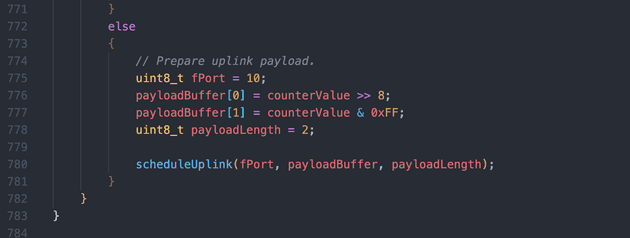
The data that’s sent by default on the LMIC-node project is a simple incremental counter. The code for the payload construction can be found in the main LMIC-node.app file:
With the basic example of LMIC-node, the transmitted counter payload will look like this in the TTN dashboard:
The payload is displayed as 00 01 because the data being sent is the integer 1 (first iteration of the counter) which has been converted to hex format, which also happens to be 1.
With payload data being received by the network, you can use the TTN integrations to receive the data in your own app/server with the use of MQTT or Webhooks, allowing hugh possibilities for IoT, including the tracking of a HAB!
When it comes to the HAB project, I’m looking to receive GPS coordinates instead of a useless incremented integer value.
Sending your own data from LMIC-node to TTN
When developing and testing, I’ve been sending values over LoRa as strings, as it makes it faster for me to work with and edit values. For example, you can create a string like:
char locationString[256];
sprintf(locationString, "%i%s%s%s%.4f%s%.4f%s%.2f%s%.2f%s%.2f", bootCount, ",", timeString, ",", lat, ",", lng, ",", alt, ",", speed, ",", temperatureC);
transmitLocation(locationString);
The above creates one big string which contains data about our balloon flight. A typical string might look like this:
234,12:23:03,23.45,-12.65,34,11,18.4 // a string of comma separated numbersThis string could then be encoded to turn each string character to bytes. The problem with that is that strings are much bigger data sets than plain byte data. It’s much more efficient to encode the data as an collection of bytes, and decode back to a more human readable format when the data is received the other end.
For example, our bootCount value increments by 1 each time a transmission is sent. If we expect the balloon flight to last 3 hours, and a transmission is sent to TTN every 1 minute, that means we aren’t expecting any more than 180 re-boots to happen. As a string, a three digit integer like "120" will be encoded and transmitted as 31 32 30, whereas the plain hex value of 120 would be encoded and transmitted as 78. That’s a huge difference which adds up over a long set of numbers.
Encoding data for transmission to The Things Network
In order to send data as bytes, it’s important to understand the context of the data that’s being sent, as it helps massively when formatting the byte data to send. Here’s a great intro guide to sending byte data, which explains the different ways to encode and transmit data to be as efficient as possible.
It’s common to send data using Hex values, which are easily converted from binary or decimal using code, or by using an online tool, but the formatting can go further than just a simple conversion. For example, if one part of your string has a decimal value of say 23.53, you could send up two separate values (23 and 53), and decode to add the decimal place in on the TTN side. Or another example could be to multiply that decimal number by 100 (leaving 2353) and dividing by 100 on the other end to get your original value (23.53). That’s why on the TTN side there are formatters.
There are some pre-defined formatters, or you can write your own in JavaScript. The LMIC-node example has a TTN formatter in the lib which decodes the hex values you see in the dashboard to decimal, human readable numbers, for example.
In order to send the different sensor, location and other data over LoRa to a TTN gateway, I decided to use a library to handle the complexity of formatting the data. The library is called lora-serialization and has a nice simple API to convert known data (i.e. we know the length and format of a GPS coordinate) to an efficient byte representation, and provides the decoding for the TTN functions.
For example, we can easily send GPS data:
#include "LoraMessage.h"

LoraMessage message; // be sure to keep this inside what ever function calls the message, and don't have it as a global variable

message
    .addLatLng(-64.1367, 176.2345);

yourOwnLoraSendFunction(message.getBytes(), message.getLength());

// message.getBytes() is now an 8 byte array e.g. { 0x34 0x5D 0x2C 0x45 0x23 0xEA 0xAA 0xFF }
Note how the lat and lng values (comprising of 13 individual numbers) are formatted to just 8 bytes.
If you want to view the contents of the message during development, you must loop through the array and print each byte:
void printHex(uint8_t num) {
  char hexVal[2];
  sprintf(hexVal, "%02X", num);
  Serial.print(hexVal);
}

int i;
for(i=0; i < message.getLength(); i++){
  printHex(message.getBytes()[i]);
}
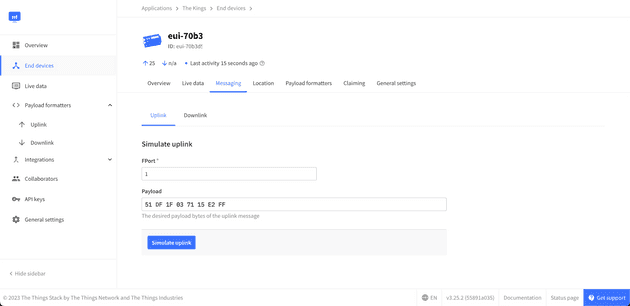
I wasn’t near a gateway, but I could still test how to data was handled by the formatting library because TTN allows you to send test byte data to run through the formatters. Example - if I encode my current coordinates:
message
	.addLatLng(52.4204338, -1.9605916);
I can then view the bytes using the printHex function mentioned above with a Serial.print():
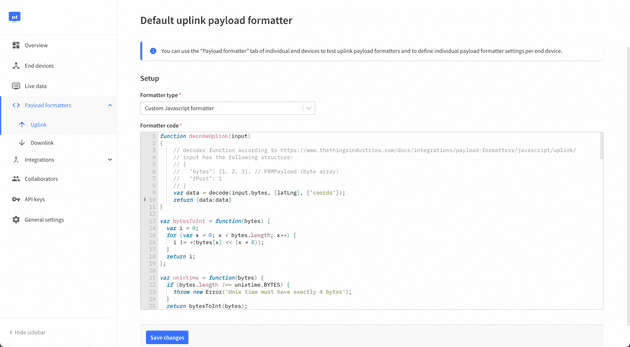
51 DF 1F 03 71 15 E2 FFThen follow the lora-serialization instructions on how to add the formatter to TTN:
It’s not clear in the lora-serialization docs that line 9 in that screenshot should be amended to what data you’re sending. Like I said earlier, the formatting/decoding only works if both sides have an understanding of the data format, otherwise it won’t be as efficient (and in this example simply won’t work at all). So in my example I’m just sending lat lng values, but if you are also sending a 16bit integer, decodeUplink functions needs updating accordingly.
Once the formatter is copy and pasted, go to the “Messaging” tab, and add the byte array that we printed earlier. Press send:
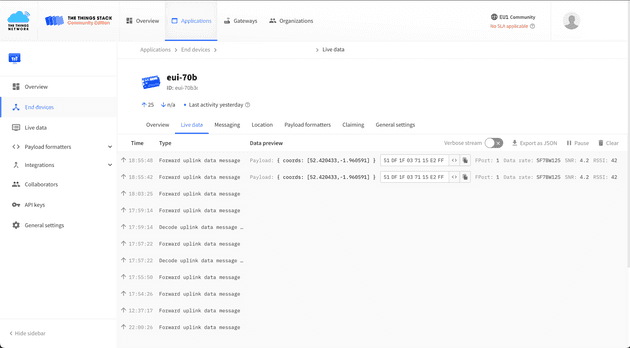
And finally, go to the “Live Data” tab and you can see the decoded data in a nice human readable format:
Using webhooks to do something with the payload once received
It’s great to see the decoded payloads coming through to the dashboard area, but there’s not much that can be done on TTN side without passing the data elsewhere to be processed. You may want to pass the data on to another system to store in a database, perform additional processing, or distributing to a collection of listeners.
Webhooks are one way of processing or passing the data on.
Testing locally
If you’re not near a gateway, or would like to do a load of testing of the payload formatting, you can test webhooks locally using a tool like ngrok.
After installing, point ngrok to your local API. My local API is running from Docker which is exposed locally as http://localhost:8001, so just run ngrok http 8001 and you’ll be able to visit the web URL which ngrok provides as a way to hit your local server from the TTN webhooks.
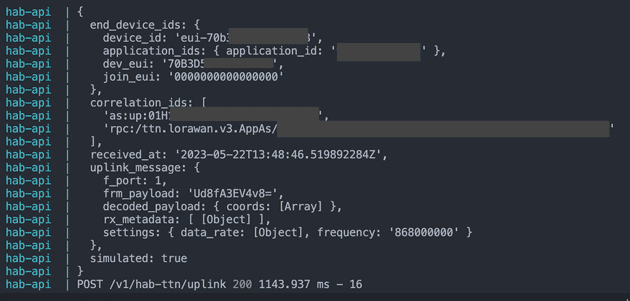
The webhook will send a post request to the endpoint you configure in the TTN area, and will look something like the following format:
After the previously formatting is done, the formatted payload will be accessible in the decoded_payload key.
Senior Engineer at Haven

