Tracking high altitude balloons with LoRa using Raspberry Pi gateway
May 20, 2023
Image source: a wonderful creation by Dall-E
My previous post covered simple point to point LoRa communication, and while it is possible to track a HAB (high altitude balloon) this way, there are more interesting approaches. This post will document a solution for creating a balloon tracking gateway, including seeing live results on a public map dedicated to HAB activity around the world, Sondehub.
This post contains
- What is a LoRa gateway?
- What is Sondehub
- Setting up a LoRa communication ready for upload to Sondehub
- Seeing your telemetry data sending from gateway to map
- Other approaches for gateways
- Next steps
What is a LoRa gateway?
A LoRa gateway is a device which receives a transmission and is able to pass that data to the internet to be used in a variety of ways. If you Google “LoRa gateway” you’ll likely see a load of content relating to LoRaWAN, which is a hugely popular protocol for a network of LoRa devices, that is not specific to high altitude balloon tracking. I’ll do another post specifically on LoRaWAN in future, but this post focuses on a different LoRa approach that is specific to HAB, and that’s Sondehub.
A LoRa gateway can be any device, as long as it is able to receive a LoRa transmission. For example, a Raspberry Pi, an Arduino, or any other device can be used as a gateway, as long as it is hooked up to a LoRa module and has internet access. The microcontroller/microprocessor which processes the transmission can parse the data received from the LoRa module and upload it to the internet so it can be used for anything.
What is Sondehub
A HAB can be tracked by single person, however this could be limiting in terms of what is done with the data that’s received. Sure, an Arduino can be hooked up to a LCD screen to display the latitude and longitude of a balloon you’re tracking, but it can be much better.
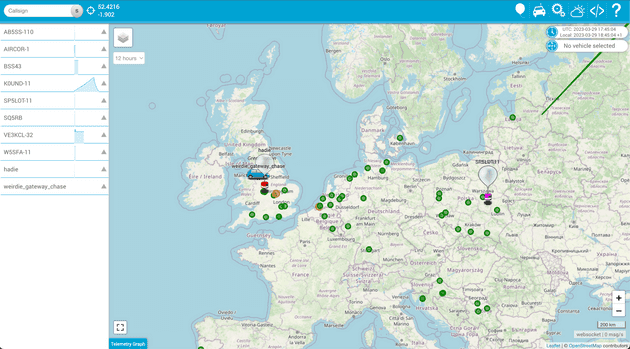
Sondehub is a global map which “displays telemetry from Amateur Radio high-altitude balloon launches”:
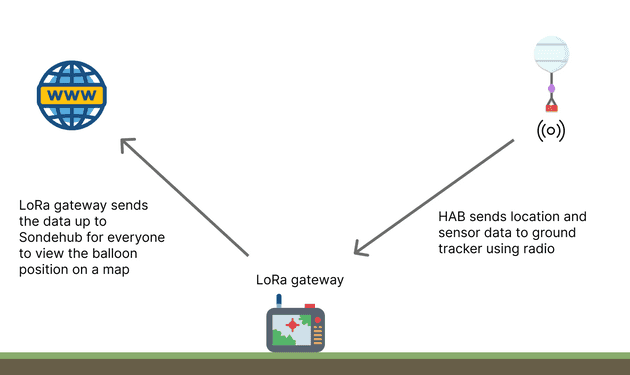
The idea is that a balloon will transmit it’s location and sensor data, and a receiver on the ground (a gateway) receives that data and uploads to Sondehub. Sondehub then parses that data and uses the latitude/longitude, altitude, callsign, and any other data, to display the balloon’s position on a global map:
Sondehub, (formerly known as Habhub), has some great documentation which includes a wiki for giving a good overview of what Sondehub can do. The only thing I’m interested in though is displaying location data on Sondehub using LoRa.
Setting up a LoRa communication ready for upload to Sondehub
I’ve chosen a Raspberry Pi to use as my gateway to begin the tracking, as it’s a small device that can sit independent of a screen/keyboard for the most part, so can be placed out of the way and be left running. The main reason I chose a Pi though is because there’s already some great gateway software available called lora-gateway.
For the demonstration purposes of this post I won’t be tracking a real balloon or using real GPS coordinates, but instead showing how to get data from a LoRa transmitter device to a gateway, and up to Sondehub to see on the map. The devices I’ll be using are:
- A Raspberry Pi 4B using lora-gateway to receive transmissions and upload to Sondehub
- A ESP32 microcontroller using arduino-lora to transmit location data
Installing and configuring lora-gateway on a Raspberry Pi
Following the documentation is a great place to start, but there’s also Dave Akerman’s website which gives a bit more in terms of instructions. These include enabling SPI on the PI, and installing dependency software.
SPI is a method of relatively fast data transfer between the Pi and external modules, and requires minimum wire connections to set up. This is different from the 2 wire UART connection that is used in many microcontroller beginner guides.
A few things to note when configuring the Pi:
- You don’t need a keyboard or screen for this as there’s nothing too visual going on - a simple SSH to the Pi over local network will be fine
- Once installed, you simply run
./gatewayto start the program and begin listening - You should only need to edit the
./gateway.txtfile which contains all the configuration options - The
./gateway.txtconfig must match the config of the sending device - more on that later - If you do want to debug other files for any reason, you can
vimornanoto edit files, and runmaketo re-build the program
The gateway.txt file you begin with will almost definitely need editing. It is designed to configure two LoRa modules, but as I’m connecting just one module directly to my Pi, my second slot is commented out. Here’s my final config:
##### Your details #####

tracker=Romulus
Latitude=52.421631
Longitude=-1.902670
Radio=LoRa RFM98 RPi 4B
Antenna=Antenna

##### Config Options #####

EnableSondehub=Y
EnableSSDV=Y
JPGFolder=ssdv
LogTelemetry=Y
LogPackets=Y
CallingTimeout=60
ServerPort=6004

NetworkLED=22
InternetLED=23
ActivityLED_0=21
ActivityLED_1=29

##### Config CE0 #####

mode_0=1
frequency_0=434.0
AFC_0=Y
DIO0_0=27
DIO5_0=26
Implicit_0=N
Bandwidth_0=125K
SF_0=7
Coding_0=7
Using the correct DIO pins
You may notice I’m not using the DIO pin numbers as described in the docs. For me, the documented pins didn’t work. I had to update to use DIO0_0=27 and DIO5_0=26, possibly because I’m using a Pi 4, or maybe my pin is faulty.
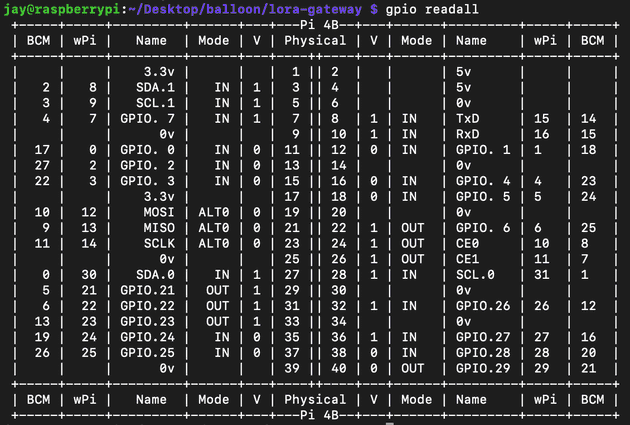
The pin numbers required by lora-gateway are NOT the GPIO pins as shown in many Raspberry Pi pinout diagrams. Instead, this library uses WiringPi to manage pin numbers.
You should already have WiringPi installed when running through the install steps, so to view all the accurate pins, run gpio readall. This will show you something like this:
You can see from that diagram that my DIO0_0 is using wPi 27, which is the equivalent to pin labelled 16 on the pinout diagrams, which is the third pin from the bottom right.
Note that I have previously spent hours trying to work out why something isn’t working, only to realise the pins are not arranged correctly. Be sure to double and triple check.
Using the correct listening mode
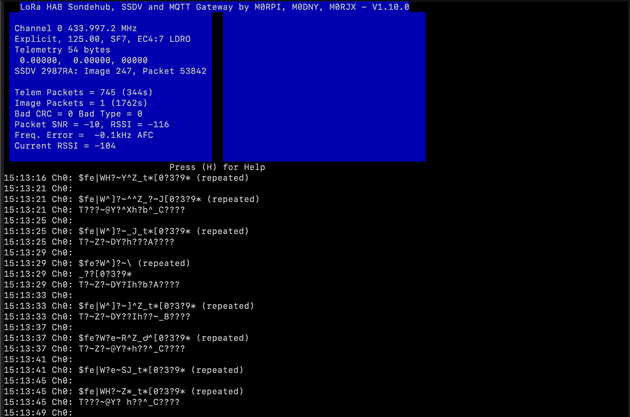
One more thing to mention about configuration is that mode_0=1 was critical with my configuration. I spent hours debugging a weird issue that I had where I was receiving weird looking packets, which was fixed as soon as I changed from mode mode_0=0 to mode_0=1. Here’s the response I was getting before hand:
Be sure that the config is set correctly, and if in doubt, start off by removing all config options apart from mode_0=1 and update the transmitter to match (more on that later).
Wiring up a RFM9x LoRa module to the Raspberry Pi
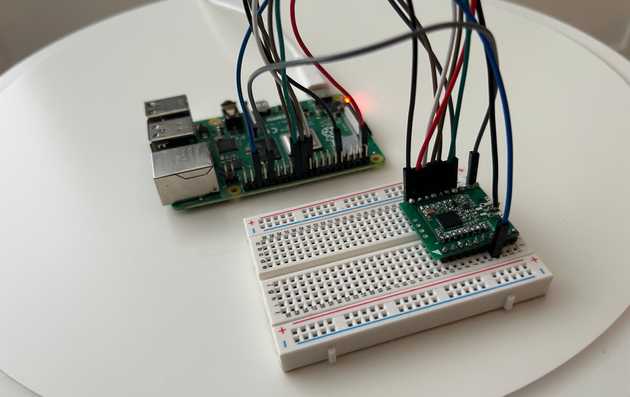
With the configuration done, the RFM98 module can be connected to the Raspberry Pi via the SPI interface.
Here’s the wiring details:
| RFM9x module | Raspberry Pi 4 |
|---|---|
| VCC | 3.3V |
| GND | GND |
| SCK | SCLK/G11/pin23 |
| MISO | MISO/G9/pin21 |
| MOSI | MOSI/G10/pin19 |
| NSS/CS | CEO/G8/pin24 |
| NRESET | G25/pin22 |
| DIO0 | G16/WiPi27/pin36 |
| DIO5 | G12/WiPi26/pin32 |
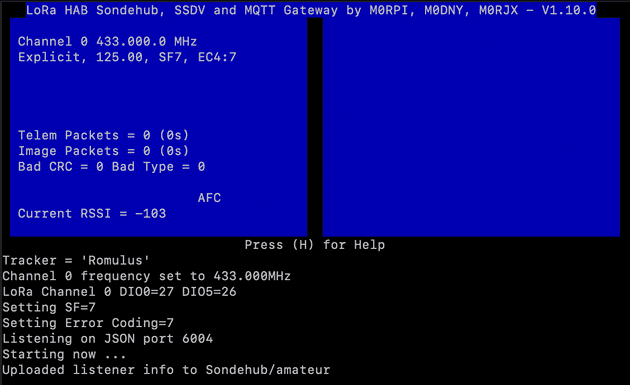
And finally, you can run ./gateway which will hopefully show you the gateway listening for incoming LoRa packets:
Of course, nothing is being received yet as the transmitter needs to be configured and started.
Installing and configuring arduino-LoRa on ESP32
Now the gateway device is listening, the LoRa transmitter can be set up to match. I’ve only recently done a guide on this, so head back to my last post to the “Using arduino-LoRa with ESP32 board” section to see the details.
I’ll be using a similar setup from the arduino-LoRa library which is based on the example sender script.
In terms of configuration, here’s my exact sending script:
#include <SPI.h>
#include <LoRa.h>

int counter = 0;

void setup() {
  Serial.begin(9600);
  while (!Serial);
  LoRa.setPins(4, 2, 15);
  LoRa.setSignalBandwidth(125E3);
  LoRa.setCodingRate4(7);
  LoRa.setSpreadingFactor(7);
  LoRa.enableCrc();

  Serial.println("LoRa Sender");

  if (!LoRa.begin(433E6)) {
    Serial.println("Starting LoRa failed!");
    while (1);
  }
}

void loop() {
  Serial.print("Sending packet: ");
  Serial.println(counter);

  char sentence[] = "$$hadie,12,10:42:10,52.486244,-1.890401,27799.3,1:10\n";

  Serial.println(sentence);

  LoRa.beginPacket();
  LoRa.print(sentence);
  LoRa.endPacket();

  counter++;

  delay(4000);
}
Although this is a very simple implementation, there are some key things to be aware on when configuring to transmit for detection by our gateway:
Ensure configuration matches that of the gateway device
In order for the LoRa modules to be able to communicate, they need to have the same:
- Frequency - 433Mhz in my case (note - this needs to match the frequency of the LoRa modules you’re using)
- Bandwidth - 125K in my case
- Spreading factor - 7 in my case
- Coding rate - 4:7 in my case
It took me a while to find a good resource to explain what these values mean at a top level, and I found a great doc over at a StuartsProjects library. That page explains what the options mean, and how to configure them to meet requirements of your project (think data speed vs distance, that sort of thing).
Sending the correct UKHAS telemetry format to be uploaded to Sondehub
The Raspberry Pi gateway which will receive the transmission from the ESP32 requires telemetry data to be passed in a specific format - the UKHAS telemetry format. As long as we send our telemetry in that format from our ESP32 transmitter to our gateway, the gateway program will parse the string and send to to Sondehub in the correct way.
The format is explained in detail on the UKHAS website and even more detail can be found on the old Habitat page.
A couple of things to mention:
- The sentence must begin with
$$ - The sentence must end with
\n(line break) - The sentence doesn’t need to contain a checksum
Here’s an example of a string:
"$$WGHSXPA,12,10:42:10,52.4118,-1.7776,245.3,any,custom,data\n"This will tell Sondehub that our callsign is WGHSXPA, we’re sending the 12th message (which should increment by 1 on each transmission), at the current time of 10:42:10, with the lat long values as 54.286244,-2.790401 at an altitude of 245.3 with custom data such as any,custom,data.
Back when HabHub was used, there was a whole process which involved flight documents and payload documents. I didn’t know anything about HAB back then, but from what I can tell you couldn’t use Habhub to show your own balloon telemetry unless these documents were created and approved by Habhub. Now though, there is no approval process so you can easily use the lora-gateway software to upload your telemetry with little friction.
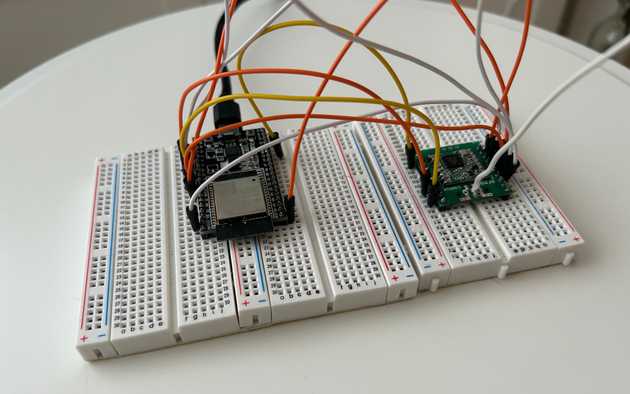
Wiring up a RFM9x LoRa module to the ESP32
With the configuration done, the RFM98 module can be connected to the ESP32 via the SPI interface.
Here’s the wiring details:
| RFM9x module | ESP32 |
|---|---|
| VCC | 3.3V |
| GND | GND |
| SCK | CLK/G18 |
| MISO | MISO/G19 |
| MOSI | MOSI/G23 |
| NSS/CS | G4 |
| NRESET | G2 |
| DIO0 | G15 |
| DIO1 | G17 |
Finally, you can upload your sketch to the ESP32 and hopefully your gateway will be receiving the transmission.
Seeing your telemetry data sending from gateway to map
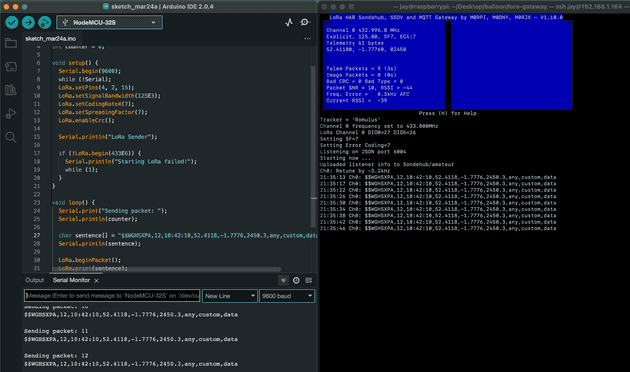
With everything set up correctly, you should see the gateway receiving the sentences from the transmitter:
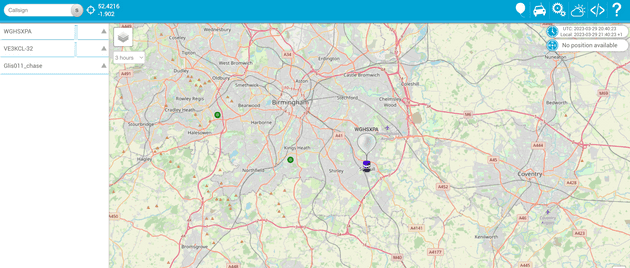
And if you then head to Sondehub, you should see the balloon on the coordinates specified by the telemetry packet.
Other approaches for gateways
There are tonnes of ways to use gateways to extend the usage of LoRa. Specifically to HAB tracking, there’s a great post on ideas to make your own using components, or using even more software for usage with a mobile phone or even a watch. As long as you are receiving the data from a LoRa module, you can do anything.
SondeHub also has an official open API which can be used to send telemetry data. This means you’d need to create your own software to parse the telemetry data and send to the API (as opposed to allowing gateway software like lora-gateway). I’ll cover that more in a future post.
Outside of the context of HAB tracking though, LoRa gateways are being used in a lot of different ways, in all sorts of industries, like farming, manufacturering, and more.
Probably the biggest LoRa network in Europe is called The Things Network which uses a protocol called LoRaWAN to securely manage a gateway/node network approach. I’ll be using that for my next post, and while The Things Network isn’t used for HAB tracking, it’s a great way to take advantage of LoRa.
Next steps
I didn’t use real GPS data in this post as the focus was getting data from the transmitting device to the gateway and up to Sondehub, however I’ll be doing a post very soon on integrating a GPS module with this setup and transmitting real data - getting one step closer to a real balloon launch!
Senior Engineer at Haven
