Installing websites as apps on mobile and desktop devices
January 22, 2022
The majority of big companies have a nice slick mobile app to be used alongside their website, but what if a mobile app isn’t a viable option? One solution is to make a website “installable”, giving the user some of the benefits of a mobile app without the potentially huge investment. This is broadly done by implementing Progressive Web App (PWA) features, and although the concept is fairly simple, I found very little content online explaining exactly how to develop the intricacies involved.
This post aims to show the development needed to make a website installable with the use of PWA tech, including service workers, by:
- Listing some benefits of making a website installable
- Showing what installing a website looks like, including how the user is informed that a website is installable, on different browsers
- Showing exactly how to make a website installable with code examples, covering the PWA criteria such as service workers and manifest files
The benefits of making a website installable on a users device
Installing a website on a users device isn’t a silver bullet solution, so it’s worth outlining what you get:
- Similar to a mobile app, installing a website allows the website to appear as an app tile on a device. This is great as users then don’t need to open a browser and enter the web address. Instead they are presented with the website, much faster and easier.
- When paired with service workers, an installable website can serve content even if the device is offline. This can include huge amounts of website data for offline use, or just a simple offline page - the choice is up to you!
- Similar to the above point, and due to the flexibility of service workers, installed websites can store certain files in a local cache on the device. For websites requesting large files, these files can be stored on the device, and served directly from the device, without requesting over the internet.
What does an installable app prompt look like on different devices
One of the confusing parts about this subject is compatibility with different devices. Specifically, which devices show a prompt to install the website, and how the prompts appear. Here’s what this looks like for one of my websites:
Chrome - MacOS
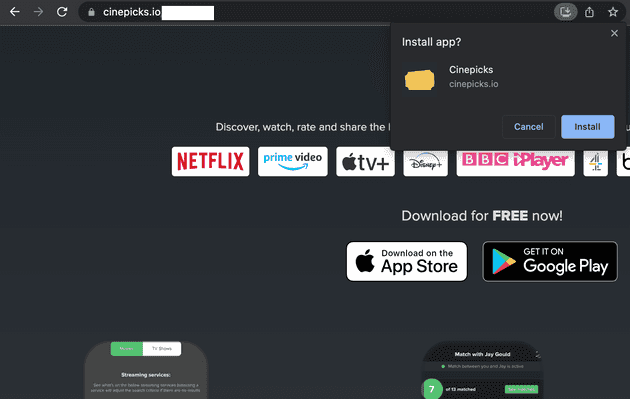
Here’s how the install icon appears on Google Chrome. There’s no popup or anything too different - just a new icon which appears in the right side of the address bar:
And when the icon is tapped:
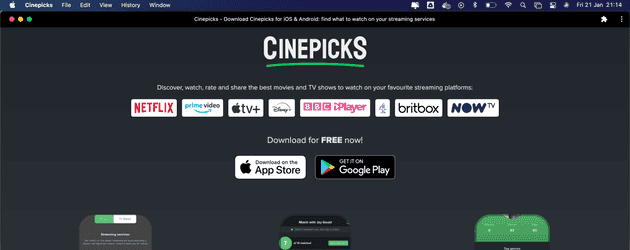
And when the app is installed and opened:
Chrome - Android
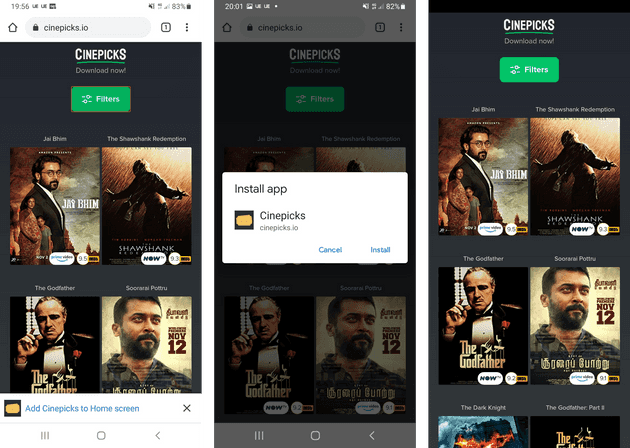
Here’s how the installable app prompt appears on Android Chrome browser, in the left image. The center image shows the modal when the icon is tapped, and the right screen shows the app installed and opened:
Compared to the Chrome solution on MacOS, the Chrome Android usage is much better in my opinion as the browser shows a fairly big popup appearing at the bottom of the page, without any user interaction. It may be a challenge to get people to install the website on MacOS Chrome, but it’s a clear, prioritised CTA on Android Chrome, which would most likely lead to more installs.
Default browser - Android
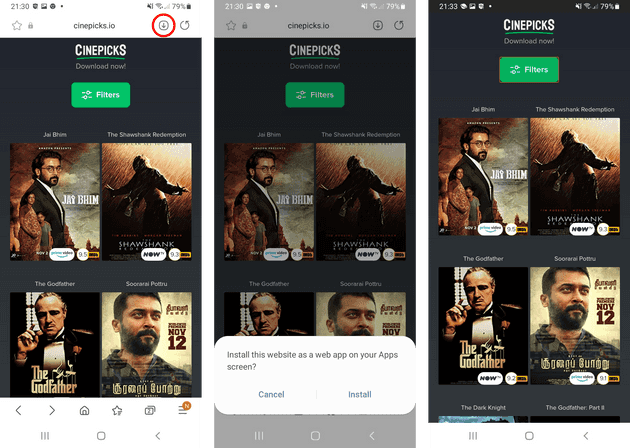
Similar to the desktop Chrome MacOS browser, the default Android browser shows a small icon near the address bar, shown on the left image. The center image shows the modal which appears from the bottom of the screen once the icon is tapped, and the right screen shows the installed website opened:
This browser doesn’t make it as obvious to the user that the website is installable, as it doesn’t automatically prompt the user like the Chrome Android browser does. There are ways to make it clear to the user though, which I’ll mention later!
Safari iOS and MacOS
This is something I feel is not really clear from reading a few websites explaining this subject - Safari does not show the user any instructions for how to install a website which has been specifically made installable by using PWA technology. It’s not that surprising when you think about it as it’s a classic Apple move. That’s not to say it can’t be done though…
How to install a PWA site on Safari for iOS and MacOS?
As mentioned earlier, a website can only be made “installable” when it meets a few requirements (mostly PWA related). I’ll go in to these in more detail shortly, but for iOS and MacOS Safari browsers, this installable aspect is a bit different to other browsers. That’s because Safari doesn’t prompt the user to install a website like the browsers shown above.
- Safari MacOS browser offers no solution to install a website as an app at all. There are third party tools out there which do provide this solution, but using third party solutions is not going to help general users of a website, or help increase conversions.
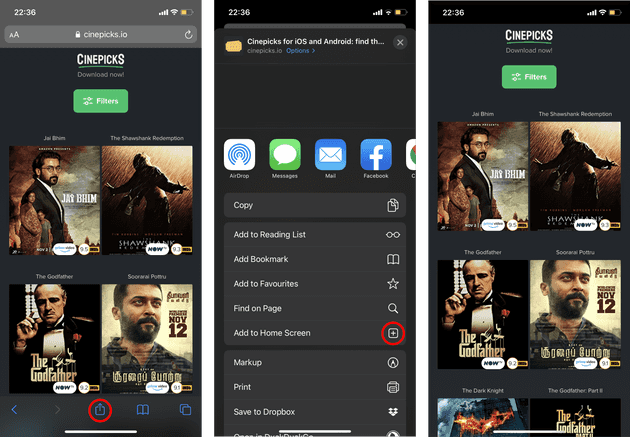
- Safari iOS browser does offer a way to install an app - this is done via the “Add to Home Screen” option in the share menu:
The Safari iOS solution is different than other browsers because it can be implemented for any website (not just websites which make use of PWA features), and there’s no prompt which differentiates an installable, PWA driven website from other sites.
So with regards to Safari browsers in general, the entire installable experience is worse than other solutions, I think.
How to make a website installable so it can be opened from the home screen
With Safari discussed and out the way, here’s what’s needed to make an app installable from other browsers. The general criteria needed can be found easily after a quick search, such as the wev.dev page, which lists:
- The web app is not already installed
- Meets a user engagement heuristic (at the time of writing this means the prompt to install a website will not appear until the user has interacted with the site for a few seconds)
- Be served over HTTPS
- Includes a web app manifest file
- Registers a service worker with a fetch handler
This is generally what’s needed for most browsers. Some browsers like Opera don’t require a service worker but it’s best to create this to get maximum compatibility
The first three on that list are fairly straight forward, but the last two (app manifest file and service workers) require some explanation. Before going in to them though, I wanted to give a quick tip which helped me a lot when trying to make my website installable.
How to check PWA and installable status of a website
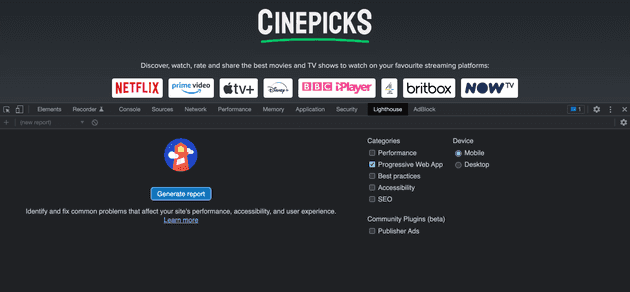
As you’re making changes to your site, you may want to check that things are working correctly, such as the manifest file and service worker status. This can be done easily in Chrome if you open the dev toolbar and go to the Lighthouse tab, then run a report with the Progressive Web App option selected:
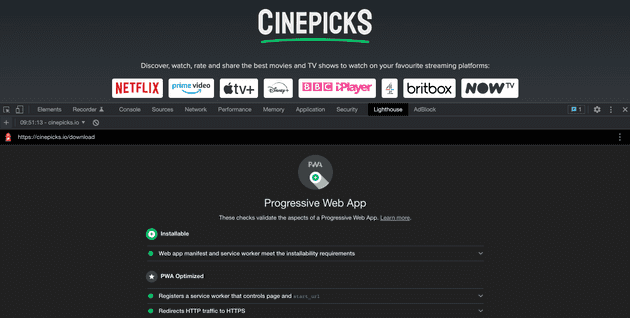
Then the report will look something like this:
My website is installable as shown previously in the post, but if you don’t have an app manifest file or correctly configured service worker, this will show errors.
Creating a web app manifest file
The web manifest file contains information about the website that is used for PWA purposes. For example, it contains URLs to an app icon which is used when installing on a home screen or as an application on desktop, and also includes the URL which should be used to open the app (perhaps you want a different landing page when the site is opened from an installed site). Here’s my Cinepicks manifest file:
{
  "id": "/",
  "Scope": "/",
  "background_color": "#ffffff",
  "theme_color": "#000000",
  "description": "Cinepicks",
  "display": "fullscreen",
  "name": "Cinepicks",
  "short_name": "Cinepicks",
  "start_url": "https://cinepicks.io/?s=hs",
  "icons": [
    {
      "src": "apple-touch-icon.png",
      "sizes": "192x192",
      "type": "image/png"
    }
  ]
}
The id property is a new addition to the manifest specification, added during the last couple of months. This field aims to explicitly pass in an ID for the manifest file rather than relying on the start_url or Scope fields which was happening differently between browsers.
The Scope property restricts the PWA app benefits to specific parts of the site. In my case, I wanted my whole site to run under the PWA scope, but it can be changed to only a subdirectory, for example.
The name is the text shown under the app icon when the site is installed on a device.
The start_url is the URL that is opened when first opening an installed site. This is usually set to the main URL of the website, but can also be something different if you wanted to give users a different experience for your installed version.
And finally the icons are used in sharing, installs, and in the browser when the app is running. This can take a number of sizes, but I like to give just one large icon as most browsers will resize for you.
The manifest file and app icon is added to a site’s publicly accessible area, and included in the head of the site:
// header.js

<link
  rel="apple-touch-icon"
  href="/apple-touch-icon.png"
  sizes="192x192"
/>
<link rel="manifest" href="/manifest.json" />
<meta name="apple-mobile-web-app-capable" content="yes" /> {/* Hides the Safari browser UI */}
<meta name="apple-mobile-web-app-status-bar-style" content="green" />
The mainfest file can be a .json or .webmanifest - both file types are supported by all major browsers
Creating a service worker to make a website installable
A service worker is needed to make a website installable. In the past, a basically empty service worker would suffice, but now some browsers require that the service worker has some sort of capability, such as being able run the website when there’s no internet connection.
Firstly a service worker needs to be loaded in to the site on page load. This implementation depends on your setup, but as I’m using React, my service worker is loaded in at the root of my app in a useEffect hook:
// app.js

useEffect(() => {
  if ("serviceWorker" in navigator) {
    window.addEventListener("load", function () {
      navigator.serviceWorker.register("/sw.js", { scope: "." }).then(
        function (registration) {
          console.log(
            "Service Worker registration successful: ",
            registration.scope
          )
        },
        function (err) {
          console.log("Service Worker registration failed: ", err)
        }
      )
    })
  }
}, [])
The scope option is set to the root of the site here. Official docs explain that this isn’t needed unless the
sw.jsfile is being loaded from a different part of the site other than the root, but this has caused issues for me in the past if it’s not explicitly defined, so I recommend keeping it there to be on the safe side.
This registers the service worker for use with the browser, from the publicly accessible part of the site. So my public folder now contains these files:
/public/images//public/favicon.ico/public/manifest.json/public/sw.js
And here’s the most basic service worker file:
// sw.js

self.addEventListener("install", function (event) {
  console.log("SW activated 🤖")
})
This was all that was needed a while back to meet requirements for an installable website, but now a little more is needed.
Service workers can be used for so many things, including offloading CPU intense operations to another thread, storing large files in caches, and much more, but for the purposes of my app I simply want to show the user a custom offline page when the user has no internet connection:
// sw.js

const cacheName = "cinepicks-cache"
const appShellFiles = ["offline.html"]

self.addEventListener("install", function (event) {
  console.log("SW activated 🤖")
  event.waitUntil(
    (async () => {
      const cache = await caches.open(cacheName)
      await cache.addAll(appShellFiles)
      console.log("Cache populated 🤖")
    })()
  )
})
The above snippet shows the service worker loading a file in to the cache on installation. This can be many files, including images, videos, fonts or anything that can be used in a normal website. When added to the cache using service workers own API with caches and waitUntil, these files can be retrieved later when the site does normal requests. I’m caching a file called offline.html which is a single HTML page that I want to be loaded when the user has no internet connection:
// sw.js

const cacheName = "cinepicks-cache"
const appShellFiles = ["offline.html"]

self.addEventListener("install", function (event) {
  event.waitUntil(
    (async () => {
      const cache = await caches.open(cacheName)
      await cache.addAll(appShellFiles)
    })()
  )
})

self.addEventListener("fetch", (event) => {
  event.respondWith(
    (async () => {
      // Respond with offline file in cache if user is offline
      const offlineFile = await caches.match(appShellFiles[0])
      if (!navigator.onLine && offlineFile) {
        return offlineFile
      }

      // Send every response back to the user as originally intended
      const response = await fetch(event.request)
      return response
    })()
  )
})
The self.addEventListener("fetch") event listens to all requests the website makes. On an average site this could be 10 or 20 requests per page load, and include html, css, js, images etc., as well as the original page request URL. For each request, I am checking if the user has an internet connection with the navigator.onLine value. If this value is false, the user has no internet, so we return the offline.html file. If the user does have internet, pass through the original request to the user.
I have a couple more additions to this implementation though:
// sw.js

const cacheName = "cinepicks-cache"
const appShellFiles = ["offline.html"]

self.addEventListener("install", function (event) {
  event.waitUntil(
    (async () => {
      const cache = await caches.open(cacheName)
      await cache.addAll(appShellFiles)
    })()
  )
})

self.addEventListener("fetch", (event) => {
  // Only show offline content when app is opened from installable PWA
  if (!event.request.url.includes("?s=hs")) return

  event.respondWith(
    (async () => {
      // Respond with offline file in cache if user is offline
      const offlineFile = await caches.match(appShellFiles[0])
      if (!navigator.onLine && offlineFile) {
        return offlineFile
      }

      // Fetch every response and store in cache
      const response = await fetch(event.request)
      const cache = await caches.open(cacheName)
      cache.put(event.request, response.clone())
      return response
    })()
  )
})
Earlier in the manifest file I added the start URL as "start_url": "https://cinepicks.io/?s=hs",. By adding a query parameter value (source = home screen) we’re able to check each request in the service worker to see if it’s coming from a home screen installed website. I have added to the service worker the functionality to only show the offline page when the app is opened from the home screen/desktop.
This is not useful as a service worker, and I’ve only done this to show another example of how a request can be intercepted by a service worker using a different method.
Finally, I’ve set every request to be cached by the service worker. This is common practice, and often done so future requests can be handled by the service worker. I’ve not done that here as I’m passing the original request back from the internet, to keep a simple service worker.
What to do if your service worker is not updating
When changing a service worker file, you may not see the results in the browser right away. This is because a service worker persists page refreshes. In order to see changes in a service worker, you need to close the browser tab and re-open.
How to uninstall an installed web app
You may also want to uninstall your site while developing/testing. To do this (on Chrome MacOS at least), it can be done from the menu within the app:
Tracking usage of an installed web app
You may want to track the usage of the installed application. I’ve tried finding something to highlight this in GA, but not successfully, so if there is a way let me know. Instead, I use the query string parameters mentioned earlier. These can be listened to in the app on page load, and sent up as an event. Alternatively, the pages with the query string parameter should appear in the page views report.
Thanks for reading.
Senior Engineer at Haven
