Making screenshots for social sharing with Puppeteer & Node
December 28, 2021
A feature I recently added to my Cinepicks app was to give users the ability to share their watch lists using a unique web address, such as one of my latest share lists. The list sharing implementation is pretty standard itself, which I’ll cover a little at the start of this post, but the primary aspect of this share feature I wanted to cover is that the share link uses a dynamically generated open graph image screenshot containing films/shows on the list. The screenshot is taken with Puppeteer and uploaded to Cloudinary, so this post will focus on that part of the stack.
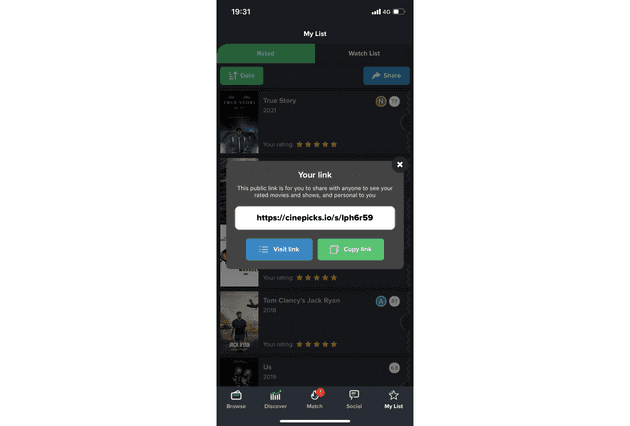
The user journey to create a share list
The share list and screenshot generation starts with a user creating a share link within the Cinepicks app:
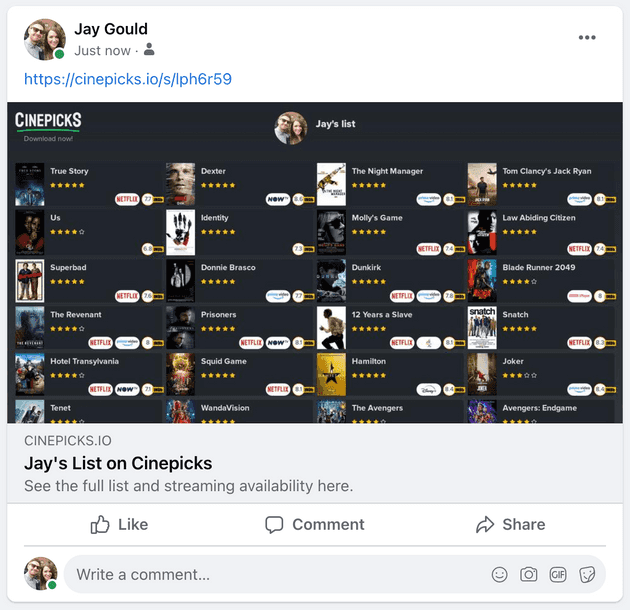
As the share link is generated, Puppeteer is used to create a screenshot of the page, which is immediately uploaded to Cloudinary, and the Cloudinary URL then added to the share list record in the database. This Cloudinary URL is then used as an Open Graph image when the share list page is opened in a browser. The open graph image is visible when sharing on social, making the share link a bit more interesting. Here’s an example of how the list shows on Facebook:
This gives the benefit of showing the user roughly what the link contains. Having a brief look at the content of the page can help provide the user with greater detail and help towards higher click through rates, especially if the content in the image is relevant and looks good.
Generating the share link with the Node API
The share list is generated when the app sends a request to the Cinepicks API:
// ListShare.js

async function getUserListShareLink(userId) {
  // Get a list of the users most recently rated titles
  const userTitles = new UserTitles(userId)
  const titles = await userTitles.getUserMostRecentRated()
  if (!titles && !titles.length) return null

  try {
    // Generate a short, unique code to be used in the web page URL (lph6r59 in the example above)
    const code = generateCode()
    // Add the titles to the database along with the user ID and list code
    await db.user_list_share.create({
      userId: userId,
      listCode: code,
      titles: JSON.stringify(titles.map((title) => title.imdbId)),
    })

    // The important part! Generating the screenshots
    generateScreenshots({ code })

    // Send the link back to the app to show the user (https://cinepicks.io/s/lph6r59 in the example above)
    return constructLink(code)
  } catch (e) {
    console.log(e)
  }
}
As shown above, the database stores all relevant information relevant to a users list - namely the listCode (short, unique string to produce an easy to read URL), and the titles (an array of IMDb ID’s related to the list).
A quick note: the database design opted for here uses a serialized string of IMDb ID’s for a single share list in the “titles” column. This goes against standard normalization rules, but as there could potentially be hundreds of items in a list, I’ve prioritized performance. Standard database normalization here would mean a lot of joins with data being distributed across different tables.
Visiting the share link returned from the above function, such as https://cinepicks.io/s/lph6r59, uses the listCode at the end of the URL to retrieve the list data. This means the page has all the data above ready to be displayed on site, including the Open Graph screenshot generated by Puppeteer!
Generating the screenshot with Puppeteer and Node.js
As mentioned earlier, the screenshot generation process is the focus of this post. Puppeteer on Node.js is used to handle the screenshot taking, so I started by installing Puppetter on my project:
npm i puppeteer-coreThe generateScreenshots() function mentioned earlier is executed at the moment the share list is created by the list sharer within the app:
// ListShare.js

async function generateScreenshots({ code }) {
  const screenshot = new ScreenshotGenerator()
  const screenshotUrl = await screenshot.startGenerateScreenshot({ code })

  // ... save screenshots to Cloudinary
}
This calls a ScreenshotGenerator class, which handles the Puppeteer instance to take the screenshots and upload them to Cloudinary:
// ScreenshotGenerator.js

const puppeteer = require('puppeteer-core');
const iPhone = puppeteer.devices['iPhone 11'];
const cloudinary = require('cloudinary').v2;
cloudinary.config({
  cloud_name: 'xxxxx',
  api_key: 'xxxxx',
  api_secret: 'xxxxx',
  secure: true
});

const isDev = process.env.NODE_ENV !== 'production';

class ScreenshotGenerator {
  // Hard code the exePath variations so Puppeteer can run on Linux (my production environment) and MacOS (my dev environment)
  public exePath: any =
    process.platform === 'win32'
      ? 'C:\\Program Files (x86)\\Google\\Chrome\\Application\\chrome.exe'
      : process.platform === 'linux'
      ? '/usr/bin/chromium-browser'
      : '/Applications/Google Chrome.app/Contents/MacOS/Google Chrome';

  constructor() {}

  public async getOptions(isDev) {
    let options;
    if (isDev) {
      options = {
        args: ['--disable-dev-shm-usage', '--no-sandbox'],
        executablePath: this.exePath,
        headless: true
      };
    } else {
      options = {
        args: ['--no-sandbox', '--disable-setuid-sandbox'],
        executablePath: this.exePath,
        headless: true
      };
    }
    return options;
  }

  public async startGenerateScreenshot({ code }) {
    // Construct the URL to the share list web page with "screenshot=true" query string
    const pageToScreenshot = `${process.env.CINEPICKS_IO_URL}/s/${code}?screenshot=true`;

    const screenshot = await this.takeScreenshot(pageToScreenshot, isDev);
    const cloudinaryUrl: any = await this.uploadScreenshot(screenshot);

    return {
      code,
      urls: cloudinaryUrl.secure_url
    };
  }

  public async takeScreenshot(pageUrl, isDev) {
    const options = await this.getOptions(isDev);
    const browser = await puppeteer.launch(options);
    const page = await browser.newPage();
    await page.emulate(iPhone);
    await page.setViewport({
      width: 1200,
      height: 628,
      deviceScaleFactor: 2
    });

    await page.goto(pageUrl);
    await page.waitForTimeout(8000);

    const screenshot = await page.screenshot({
      type: 'png',
      omitBackground: true,
      encoding: 'binary'
    });

    await browser.close();

    return screenshot;
  }

  public async uploadScreenshot(screenshot) {
    return new Promise((resolve, reject) => {
      const uploadOptions = {
        folder: 'cinepicks/share-list'
      };
      cloudinary.uploader
        .upload_stream(uploadOptions, (error, result) => {
          if (error) reject(error);
          else resolve(result);
        })
        .end(screenshot);
    });
  }
}

export { ScreenshotGenerator };
Preparing the page for Puppeteer’s screenshot
The startGenerateScreenshot() is ran first, where the URL for the share list page is constructed. This passes a “screenshot=true” query string parameter, which is used so the Cinepicks.io site can adjust the styling of the page ready for the screenshot. The Open Graph image needs to show as much relevant information as possible as the image is resized to fit in an Instagram/Facebook post, so removing an unneeded elements is crucial. Here’s the both versions side by side (normal version on the left, and screenshot param version on the right):
Then, the takeScreenshot() is ran which handles Puppeteer. One notable part is the:
await page.emulate(iPhone)
await page.setViewport({
  width: 1200,
  height: 628,
  deviceScaleFactor: 2,
})
This is important as it’s a great way to set the screenshot to a high definition image to get the quality needed to show a good level of detail.
Waiting for the list page to gather data
Another notable part of the screenshot generation is the:
await page.waitForTimeout(8000)This instructs Puppeteer to wait 8 seconds before taking the screenshot, which is needed so the page has enough time to do an initial load. On the share list page’s first load, each IMDb ID in the titles column is mapped to retrieve all relevant data about each title, including the streaming availability and the sharer’s rating. This takes milliseconds for a list with 10’s of titles, but for 100’s of titles this could take a second or two.
This wait is needed as this screenshot will be the very first request going to the list page, which initiates the database querying. However, during that first request, the response is saved to a Redis cache, meaning subsequent visits to the page are almost instant, regardless of the size of the list.
Saving the screenshots to Cloudinary
Going back to the startGenerateScreenshot() function - once the screenshot is created and returned, it’s then uploaded to Cloudinary using uploadScreenshot():
// ScreenshotGenerator.js

class ScreenshotGenerator {
  // ..

  public async startGenerateScreenshot({ code }) {
    // Construct the URL to the share list web page with "screenshot=true" query string
    const pageToScreenshot = `${process.env.CINEPICKS_IO_URL}/s/${code}?screenshot=true`;

    const screenshot = await this.takeScreenshot(pageToScreenshot, isDev);
    const cloudinaryUrl: any = await this.uploadScreenshot(screenshot);

    return {
      code,
      urls: cloudinaryUrl.secure_url
    };
  }

  // ..

  public async uploadScreenshot(screenshot) {
    return new Promise((resolve, reject) => {
      const uploadOptions = {
        folder: 'cinepicks/share-list'
      };
      cloudinary.uploader
        .upload_stream(uploadOptions, (error, result) => {
          if (error) reject(error);
          else resolve(result);
        })
        .end(screenshot);
    });
  }

  // ..
}
The uploadScreenshot() simply passes in the screenshot to Cloudinary’s API, specifying the folder which I’d like the screenshot to be added to (one of the great parts of Cloudinary), then the URL of the screenshot is passed back to startGenerateScreenshot() and subsequently back to the initial generateScreenshots() function mentioned at the top of the post:
// ListShare.js

async function generateScreenshots({ code }) {
  const screenshot = new ScreenshotGenerator()
  const screenshotUrl = await screenshot.startGenerateScreenshot({ code })
  saveScreenshots({ code: screenshotUrls.code, urls: screenshotUrls.urls })
}

async function saveScreenshots({ code, urls }) {
  const shareList = await db.user_list_share.update(
    {
      screenshotUrls: JSON.stringify(urls),
    },
    {
      where: { listCode: code },
    }
  )
  return shareList
}
Now the screenshot URL is in the database, it’s available on future requests to the web page. This means when the list share page URL is pasted in to a social platform, the OG image is found and displayed as a preview image on the post.
Adding Open Graph images to show on social platform link preview
OG images are implemented in different ways depending on the platform you’re using. As my Cinepicks site uses Next.JS, here’s how I’ve added the images using the Next.JS NextSEO package:
<NextSeo
  title={`${user.firstName}'s List | Cinepicks for iOS and Android`}
  description={`${user.firstName}'s List on Cinepicks`}
  canonical={`https://cinepicks.io/s/${list.shortId}`}
  openGraph={{
    url: `https://cinepicks.io/s/${list.shortId}`,
    title: `${user.firstName}'s List on Cinepicks`,
    description: "See the full list and streaming availability here.",
    images: list.screenshotUrl
      ? [
          {
            url: list.screenshotUrl[0],
            width: 1200,
            height: 628,
            alt: `${user.firstName}'s list screenshot 1`,
          },
        ]
      : null,
    site_name: "Cinepicks",
  }}
/>
Thanks for reading!
Senior Engineer at Haven


