Integrating Zigbee2MQTT with Home Assistant in a Raspberry Pi K3s cluster
January 12, 2024
Image source: a wonderful creation by Dall-E
My previous post covered how to install and configure a K3s self hosted Home Assistant on a Raspberry Pi. This post will show how to integrate the popular tool, Zigbee2MQTT, with that setup.
What is Zigbee?
Home Assistant is just the software that can be added to a machine like a Raspberry Pi. Additional hardware can be added in 2 ways:
- Home Assistant finds compatible services on a local network or on another medium such as Bluetooth. You’ll likely have some local network services detected when first opening Home Assistant. This can include things like a smart TV, a Plex media server, or an existing Ring or Hue hub. You can certainly utilise Home Assistant with this method, but there’s another (in my opinion way more powerful) way that can be used alongside using a local network.
- Using additional hardware (such as a USB controller) to receive data outside of your local WiFi/ethernet network. This includes direct connections with things like Zigbee/Z-wave powered sensors.
The benefit of utilising additional hardware like a Zigbee USB controller is that you can receive the Zigbee device signals directly, without involving multiple third party hardware hubs. For example, you may have Hub bulbs, Aqara door sensors, and Ikea light switches. Rather than having 3 separate hubs receiving data from these devices, cluttering up your house and sending god-only-knows what data to the cloud, you can instead have all Zigbee devices controlled by a single piece of hardware.
This is often referred to as having “local control” of smart devices, as it means not being tied in to a certain cloud provider.
There are alternatives to Zigbee, such as Z-wave, but from what I can tell, Z-wave is not as popular as Zigbee, especially in UK. Anyone can make a Zigbee device, and there are plenty available in the UK and on sites like Aliexpress. Z-wave, however, requires that the device is certified. There are less of them, and less hobbyists tend to go for them.
Another benefit of Zigbee is that many devices automatically act as “routers”, passing on signal from other devices back to the controller, creating a mesh network. This happens out of the box pretty much, and is a big reason people love it.
How to connect with Zigbee devices
There are a load of USB devices that can be used to receive Zigbee data. One such device is the SkyConnect. This is relatively new at the time of writing, and has positive reviews from what I can see, but the one device that seems the most popular is the SONOFF Zigbee 3.0 Dongle Plus.
This USB controller is plugged in to the host machine (Raspberry Pi for example), and is used by Zigbee software to receive data from nearby Zigbee devices.
A couple of things to note about purchasing:
- Be sure to get the Dongle E version (not the Dongle P version). You’ll see some recent posts about how the E version is newer and still experimental for the popular Zigbee2MQTT software, but I have used it without any issues at all, so would recommend based on the fact it’s the newer device and something the HA/Zigbee2MQTT teams will be working towards.
- Also be sure to buy a USB extension cable. While I’ve not experienced any issues myself, it’s recommended that the Zigbee USB dongle is positioned away from the USB ports on the host machine due to interference issues.
Using add-ons in Home Assistant with K3s cluster
Aside from the physical USB dongle that receives the Zigbee signal, we need to do some work in Home Assistant to process the data. Of the various HA installation methods, installing in K3s can be done using the HA Docker image, and doing so means we don’t have access to the “Add-ons” feature of Home Assistant.
Connecting Zigbee devices requires an Add-on, and it would be really easy to do this with the traditional HA OS installation. With the container installation though, we must manually create the Add-on. There’s more about this in my previous post.
One popular Add-on is ZHA, which is known as the easier method from what I can tell (I’ve never used it), but one downside is that there’s not as much support as other Add-ons like Zigbee2MQTT. A great site is zigbee.blakadder.com which shows a list of tonnes of Zigbee devices along with the Home Assistant integrations that are supported. From this list you’ll see that Zigbee2MQTT supports the vast majority of devices, in contrast to Home Assistant which supports relatively few.
The rest of this post will cover how to integrate Zigbee2MQTT and Mosquitto with Home Assistant, and how to connect and control devices.
What is Zigbee2MQTT and Mosquiotto
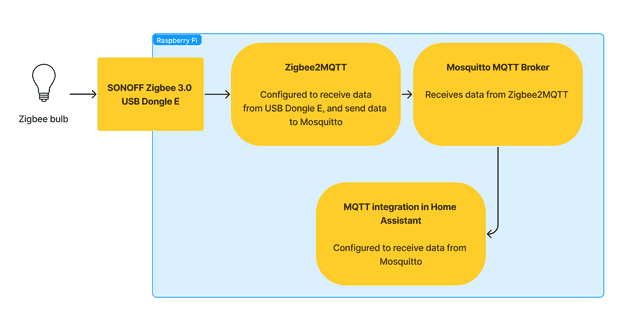
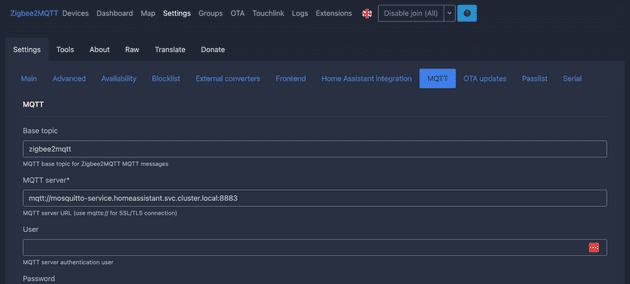
Zigbee2MQTT is a bridge that allows Zigbee data to be passed to an MQTT broker. The MQTT broker in my case is Mosquitto. Both are configured as services in the K3s cluster, and Mosquitto’s details are configured in Home Assistant:
Using MQTT is great because it’s a ubiquitous in the smart home/IoT world. Most devices, Zigbee or otherwise, will have a library to get data into MQTT and have the messages routed to their end end destination, in our case Home Assistant.
Here’s the Home Assistant K3s repo I’ll be referencing in this post:
Home Assistant, Zigbee2MQTT, and Mosquitto running in K3s
This shows how my HA is set up. I have stripped out all of my Helm config so it’s easier to read. Running a simple kubectl apply -f ./ should get it up and running.
Integrating Mosquiotto with K3s and Home Assistant
Configuring Mosquitto MQTT broker initially without a password
I recommend starting by getting Mosquitto working with basic configuration first:
apiVersion: v1
kind: ConfigMap
metadata:
  name: mosquitto-config
  namespace: homeassistant
data:
  mosquitto.conf: |
    # ONLY USE FOR TESTING
    allow_anonymous true

    persistence true
    persistence_location /mosquitto/data/

    log_dest stdout

    listener 8883
    protocol mqtt
The above shows the ConfigMap for Mosquitto configuration. The allow_anonymous true is set to allow all connections, without password security. The final version in the repo linked to above includes password security, but I ran into a couple of issues with setting the password. Getting the passwordless Mosquitto working first will help isolate any issues.
Setting up password security with Mosquitto
Once Mosquitto is running fine in K3s, it’s worth adding a password. Mosquitto passwords must be referenced in the config to a password file, which contains the username and hashed password in the following format:
// password.txt
username:password
The password in the file should be hashed, and Mosquitto provides a way to hash the password for us using the CLI tool in the Mosquito pod:
- First, bash into the Mosquitto pod
- Create a file with
vi password.txt, and enter your desired username and password in plain text, like:
// password.txt
mqtt-user:my-secret-password- Save the file
- Run
mosquitto_passwd -U password.txt- this will hash the password and update thepassword.txtfile like:
mqtt-user:$7$101$Vw8R6xysTX2XUN4oMwuRl2AdH6lduV7j43/hhTNU52iCPQ4Q5Zl/eGhEUdnvA==- Copy the contents of the file, and delete the
password.txtfile - we won’t be needing this as we’ll configure using a Kubernetes ConfigMap - Then add the password to a ConfigMap:
apiVersion: v1
kind: ConfigMap
metadata:
  name: mosquitto-password
  namespace: homeassistant
  labels:
    app: mosquitto
data:
  password.txt: |
mqtt-user:$7$101$Vw8R6xysTX2XUN4oMwuRl2AdH6lduV7j43/hhTNU52iCPQ4Q5Zl/eGhEUdnvA==- Then update the
mosquitto-deployment.yamlto include the password config - Then reference the password file in the original config:
apiVersion: v1
kind: ConfigMap
metadata:
  name: mosquitto-config
  namespace: homeassistant
data:
  mosquitto.conf: |
    persistence true
    persistence_location /mosquitto/data/

    log_dest stdout

    listener 8883
    protocol mqtt

    allow_anonymous false
    password_file /mosquitto/password/password.txt
Troubleshooting Mosquitto password
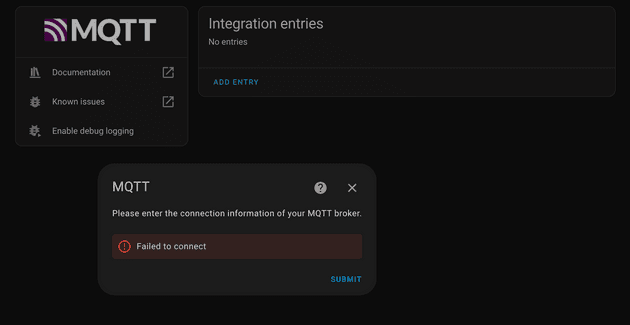
I originally couldn’t get the password config working. Even though the password was in the password.txt file, hashed correctly, and Mosquitto was running fine, the connection from HA would fail with the following:
To help:
- Ensure the username and password you’re using is not the same as the Home Assistant one. For some reason having the same username as my HA account caused issues
- Be sure to restart the HA and Mosquitto pods when ever you are editing anything password related like mosquitto-password and mosquitto-config configmap files.
Adding Mosquitto to Home Assistant using the MQTT integration
Now Mosquitto is running and is password protected, we can add to Home Assistant. Go to Settings > Devices & Services > Add Integration. Then search for MQTT, and select the MQTT list item, which will show a modal to enter the Mosquitto details.
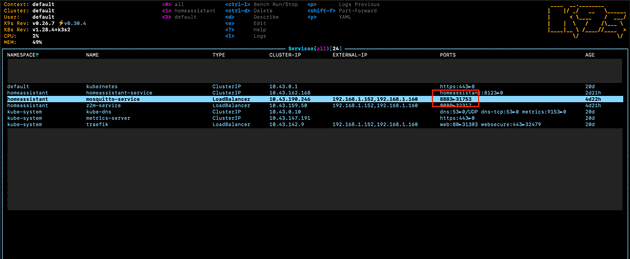
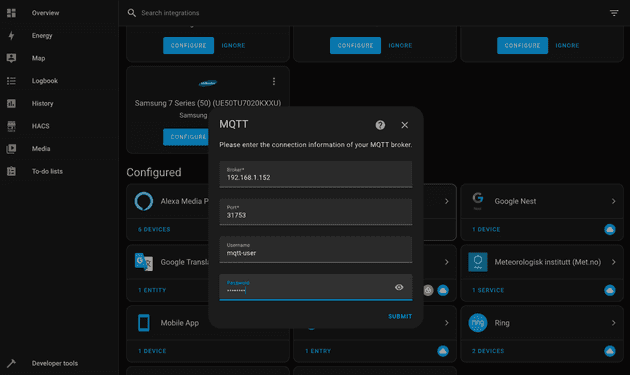
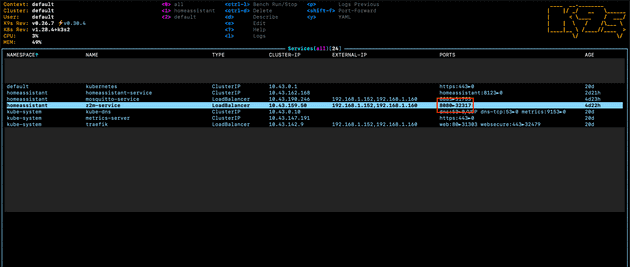
The Broker field should be the IP address that Mosquitto is running on. In my case, I’m referencing the node in my cluster that Mosquitto is tied to. This is the local IP address 192.168.1.152, which is exposed from K3s because of the Traefik service of type LoadBalancer. By default, Traefik opens the IP addresses of both nodes when a LoadBalancer is created.
The port field (in my case 31753) should be the port that is accessible from inside the cluster, as the MQTT server is accessed from the HA service inside the cluster:
Finally the username and password are entered:
Integrating Zigbee2MQTT with K3s and Home Assistant
Configuring Zigbee2MQTT to connect with Mosquitto
This setup is mostly straightforward if the Kubernetes config files are used in my example repo.
The most notable file is the z2m-deployment.yaml which hold environment variables to point Zigbee2MQTT to the Mosquitto broker:
# z2m-deployment.yaml
  ...

  - name: ZIGBEE2MQTT_CONFIG_MQTT_SERVER
    value: "mqtt://mosquitto-service.homeassistant.svc.cluster.local:8883"
  - name: ZIGBEE2MQTT_CONFIG_MQTT_USER
    value: "mqtt-user"
  - name: ZIGBEE2MQTT_CONFIG_MQTT_PASSWORD
    value: "password"
  - name: ZIGBEE2MQTT_CONFIG_HOMEASSISTANT
    value: "true"

  ...
Note that similar to setting the password for HA MQTT integration, the Z2M deployment needs restarting when adding/removing passwords int he ENV above.
The ZIGBEE2MQTT_CONFIG_MQTT_SERVER here is points to the server inside the cluster as the two services communicate within the cluster. The inter-pod communication uses the following URL structure:
mosquitto-servicereferences the service namehomeassistantreferences the K3s namespacesvc.cluster.localreferences that we’re sending a request to another service8883references the port that the LoadBalancer service exposes to the outside of the cluster
The ZIGBEE2MQTT_CONFIG_HOMEASSISTANT flag is set to false by default, so this needs to be set to true in order to have the Zigbee data in the structure for Home Assistant.
If you see the error Error: Connection not initialized when trying to start up Zigbee2MQTT, try restarting your host machine.
Viewing Zigbee2MQTT dashboard
Zigbee2MQTT offers a dashboard which can be used to see an overview of all connected Zigbee devices. This is a useful place to start looking if there are issues with devices appearing in Home Assistant.
The URL for the dashboard in my case is http://192.168.1.152:8080:
192.168.1.152references the IP address which is exposed on the K3s cluster that points to the Zigbee2MQTT service8080references the port that the LoadBalancer service exposes to the outside of the cluster
From the URL you can view/edit settings, and see lists of devices:
Settings in environment variables vs setting in Zigbee2MQTT dashboard
You can update settings in the Zigbee2MQTT dashboard, but doing so will mean they might need re-setting in future. My configuration in z2m-deployment.yaml sets a persistent volume to hold all this data:
    ...

    volumeMounts:
      - name: z2m-data
        mountPath: /app/data
  volumes:
    - name: z2m-data
      persistentVolumeClaim:
        claimName: z2m-data

  ...
Note that without the PVC, settings and paired devices will not persist when a pod restarts, so this is pretty much critical to implement and test.
By I find that setting the config options using the environment variables is more effective so I know they won’t need editing in the dashboard later.
A ConfigMap can get around this, with the idea being that config is set in a yaml file and mounted to the container, however because the config file is also updated by Zigbee2MQTT (if a user edits the settings in the dashboard), this isn’t an easy task. The Zigbee2MQTT config file that we would be setting in the ConfigMap is read-only by default due to the nature of a ConfigMap. This causes Zigbee2MQTT to error when ever settings are changed in the dashboard, and error when a Zigbee device is added (because devices are added to config file too).
This post shows a work around but I wasn’t a fan of not being able to use the dashboard, and also the part about pointing devices to a new file just to get around the readonly issue when adding new devices didn’t sit right with me.
Discovery not working
HA was originally not auto discovering devices on my network. This happens because HA is running on the K3s network which by design is separated from the host machine’s local network.
HA discovers devices on local networking using a number of different methods, and I didn’t fancy figuring out how to expose kubernetes to each of these individually. Instead I opted for the sledgehammer solution, which is to add hostNetwork: true to the HA deployment. This ensures HA is exposed fully to the host machine’s network, allowing auto discovery.
Discovering Hue bulbs that need a factory reset
The whole point of getting the SONOFF Zigbee 3.0 Dongle E was to have just one hub, and not need the Philips Hue Bridge. I have Hue bulbs already paired to my Hue Bridge, and after some Googling it seemed like a bit of a pain to link already paired Hue bulbs to Home Assistant. A lot of articles say you about using a dimmer switch or turning the light on and off 5 times in 10 second intervals. None of this worked for me, and instead I found two approaches that worked:
Method 1 - deleting from the Hue app
Simply delete the bulbs from the Hue app. Doing so will un-pair it from the Hue Bridge, and allow them to be discovered by Zigbee2MQTT and shown in that dashboard. My Hue Bridge didn’t always discover the bulbs, so I often had to select “Discover by serial code”, and enter the 6 digit serial code on the bulb. Once connected to the Hue Bridge, they can be deleted right away.
Method 2 - using Touch Link
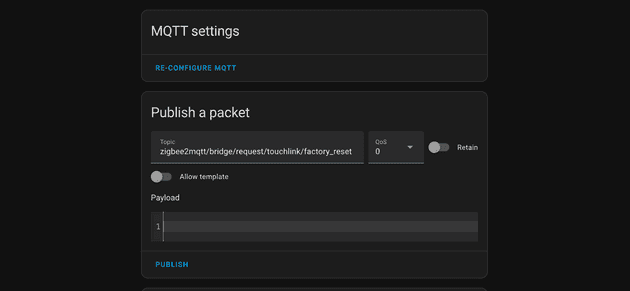
The other option is to use Touch Link - a method of pairing devices offered by Zigbee2MQTT. This can be initiated from within the Zigbee2MQTT dashboard:
- Open Home Assistant and ensure the MQTT integration is setup and connected to your MQTT broker
- Add the command
zigbee2mqtt/bridge/request/touchlink/factory_reset - Before pressing submit, ensure that your Zigbee controller is pretty much touching your bulb - it needs to be really close to the bulb otherwise it doesn’t work, which I guess is to stop you from accidentally disconnecting/pairing wrong devices
Senior Engineer at Haven

