Exposing a self hosted web app to be accessible from home network
December 12, 2023
Image source: a wonderful creation by Dall-E
I recently had issues after reaching the 4GB RAM limit on my Digital Ocean Kubernetes cluster. The cluster hosted a few side projects, and with more RAM needed in the near future, I decided to look for a different solution. I came across some solutions for self hosting, and while I have self hosted on a Pi briefly before many years ago, it seems like there are some new and better approaches now.
This post will focus on allowing traffic to your home network, which is a key aspect of self hosting. I’ll show a traditional method of exposing a home network to the internet with port forwarding and dynamic DNS, and then finish by showing my current solution that I moved to from my Digital Ocean cluster, which is to use Cloudflare Tunnels.
What is self hosting, and why do it?
A web app expecting medium to high levels of real users is best suited for typical web hosting like AWS or Digital Ocean, as they have infrastructure to easily scale and secure the app. However for some situations such as testing environments, or smaller side projects that might only get small amounts of traffic, it is possible to host on your own home network - self hosting.
Some benefits include:
- A learning experience for networking and hosting - it can be a great way to learn new tech like different approaches to networking or devops that might not be exposed in every day work life.
- Cost effective solution for hosting - cloud providers are not cheap nowadays, with the cheapest options often providing very little computing power. Self hosting puts the tech capabilities in your hands for cheap.
- Full control over your environment - you might want to start testing with an unusual piece of tech that requires specific hardware to run on, or spin up a server running a different tech stack. This becomes fully in your control with how you integrate to your existing architecture.
There are also some drawbacks though:
- Security risk - if precautions aren’t taken, some of which come as standard on regular hosting provider, meaning attackers could gain access to home network.
- If traffic to the web apps grow, it means more people using your home internet connection and hosting machine to serve the data, which may be an issue if the hardware or internet connection isn’t great.
Hosting with port forwarding and dynamic DNS
This solution is a more traditional self hosting method, and can be done fairly easily. This relies on directing web traffic directly to your home IP address, allowing traffic to be passed through your home router which uses port forwarding to direct the traffic to internal IP addresses and ports.
Port forwarding on home router
Port forwarding is done on a home router. This allows incoming connections to your home IP address to be forwarded to specific ports and local IP addresses inside the home network.
For example, if I have an app on my laptop that runs on http://localhost:3020, this same app can be accessed by any machine on my local network by specifying my laptop’s IP address (say 192.168.1.141) to construct a URL such as http://192.168.1.141:3020.
While it’s trivial to access the above app within the local network, home networks aren’t visible to the outside world by default. If we want to access the app running on my laptop from the outside world, this can be done by accessing my home networks public facing IP address.
Let’s say my home IP address is 11.12.13.14 and we want to access the internal IP of my app which is on my laptop on local IP address 192.168.1.141 - this is done by port forwarding.
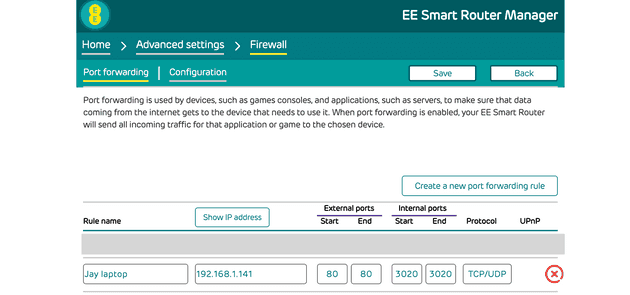
The above port forwarding config on my home router is saying that for requests to my home IP address (11.12.13.14) on port 3002, forward those requests to my internal device (192.168.1.141) on port 3020, which is hosting my application. This would allow me to access the application with http://11.12.13.14:3002.
Accessing with a port specified in the URL can be useful for background requests such as API calls, but you can also allow access through on port 80:
This setup would allow us to access the app on http://11.12.13.14.
Then finally if we wanted to use a domain name, the DNS config for a domain can be updated to point to the IP address 11.12.13.14 and that would allow us to access the self hosted app on http://www.my-domain.com:
Dynamic DNS
Port forwarding to a home IP address is great but most people don’t have static IP addresses to their home network. Home network IP addresses change every so often, and when that happens a domain name pointing to the IP address would no longer direct traffic to the home network. This is where dynamic DNS comes in.
This a process where the home IP address is periodically checked, and any changes are reflected in the DNS config of the domain name. Doing this ensures the domain name is always pointing to the correct IP address.
There are a few options for handling dynamic DNS:
Running directly on home router
This is the least invasive and doesn’t require any custom process running on your own server somewhere to keep things updated. Instead, this method relies on capabilities of your home router. Not all standard ISP routers offer this, but some do.
Some home routers have functionality built in to connect to a third party DNS service to periodically update the DNS configuration directly from the router. An example of a setup I’ve had in the past is with my EE Home Hub updating the NoIP service, and while this works really well, NoIP (along with most similar services) charge for keeping a custom domain updated.
Alternatively, custom router software such as pfSense can be used to set up dynamic dns at a router level, but this requires custom router software and possibly a new router.
Third party dynamic DNS services
A more popular option is to manually do the job of periodically updating a third part DNS service such as DuckDNS to hold your DNS records, and use this to keep your domain updated:
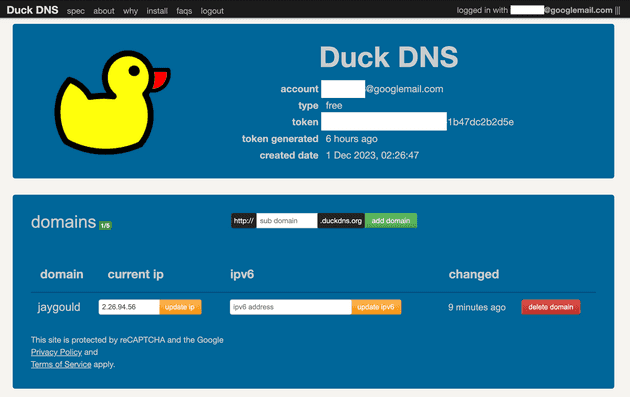
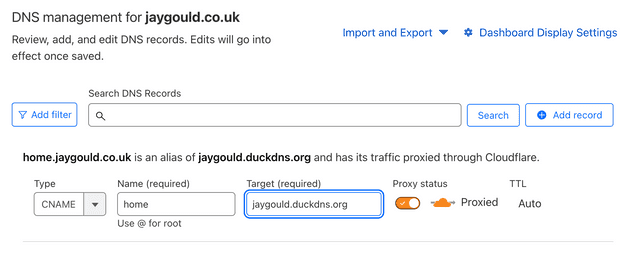
In this example, on DuckDNS I have created a domain name jaygould.duckdns.org which DuckDNS points to my IP address. I can then create a CNAME record on one of my own domains (such as home.jaygould.co.uk) and point that to my DuckDNS name:
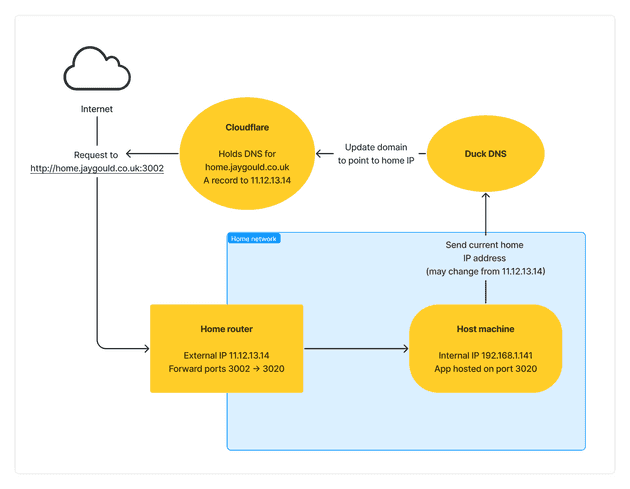
Finally to make this dynamic so the domain still points to the correct place even after my home IP address has changed, DuckDNS offers a simple API with various options. The idea is that you run a process (like a cron job) on a machine within your local network, which will periodically send the current home IP address to DuckDNS, which will in turn keep your domain name up to date.
There are other solutions besides the likes of DuckDNS, such as ddclient which handles hitting dynamic DNS provider URLs and abstracting the functionality to a (in my opinion) more suitable package than a random cron job sitting on your machine somewhere. ddclient supports a wide range of DNS providers such as DuckDNS, CloudFlare etc. so it’s a great all-round solution.
Another great third party service to keep DNS updated is Cloudflare. ddclient can be used here too, but there are also specific solutions for Cloudflare such as this popular package called cloudflare-ddns, and this neat little bash script.
Finally, another option is to use dynamic DNS clients as Docker containers. There’s a popular DuckDNS Docker image here, a CloudFlare Docker image here, and a more generic Ddclient Docker image here, both of which provide a great abstraction if you like to containerize as much as you can.
I lean towards using a container as I like to manage my containers with Kubernetes so having a dedicated dynamic DNS pod works for me. With the above third party solutions in mind, my preferred option is to run a ddclient Docker image which updates DuckDNS. To begin, start by ensuring that DuckDNS has been configured with your home IP address, and the CNAME for your custom domain is pointing to the DuckDNS domain (as described earlier).
Then running the Docker command to pull down the ddclient:
 docker run -d \
  --name=ddclient \
  -e PUID=1000 \
  -e PGID=1000 \
  -e TZ=Etc/UTC \
  -v ./:/config \
  --restart unless-stopped \
  lscr.io/linuxserver/ddclient:latest
This will create the Docker container and the config file ddclient.conf in the current directory with a mount volume. Open this file and update to add your configuration. Here’s mine for example:
daemon=300				# check every 300 seconds
syslog=yes				# log update msgs to syslog
#mail=root				# mail all msgs to root
#mail-failure=root	    # mail failed update msgs to root
pid=/var/run/ddclient/ddclient.pid	# record PID in file.
# ssl=yes 				# use ssl-support.  Works with
						# ssl-library
# postscript=script		# run script after updating.  The
						# new IP is added as argument.
##
## Duckdns (http://www.duckdns.org/)
##
#
use=web \
web=checkip.dyndns.org \
protocol=duckdns, \
password=[your-duckdns-token] \
jaygould
This will use the external service checkip.dyndns.org to get the current IP address of your home network, and update DuckDNS with the value:
This can be left running in Docker, or be used alongside a Kubernetes deployment.
Drawbacks of port forwarding and dynamic DNS
The above methods have some drawbacks which are the reason I decided not to continue self hosting many years ago. The main reason is because of security - by directing traffic to your home network you are exposing your home IP address and the hardware/services that are accessible on the forwarded ports (and potentially other ports). This opens up your home network for unauthorized access.
Sure, you can implement your own security methods to help with this, but that’s a lot of effort for a problem that just doesn’t exist in traditional hosting solutions.
This is where my preferred solution comes in as an alternative to port forwarding and dynamic DNS - Cloudflare Tunnels.
Cloudflare Tunnels
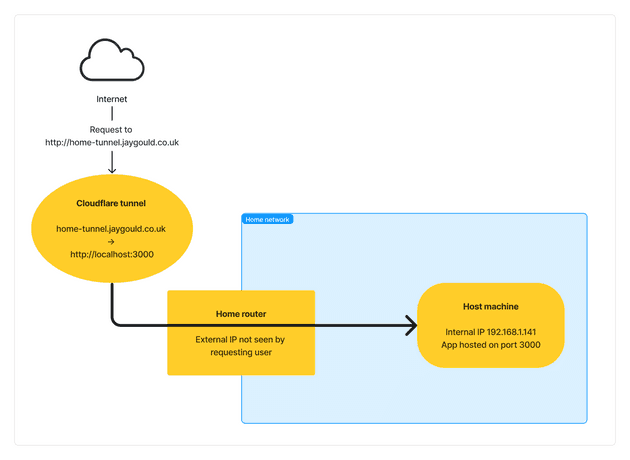
Cloudflare Tunnels (formerly Argo Tunnel) allows all traffic to a host (such as a machine on your local home network) to be routed through Cloudflare, in contrast to the above solution of allowing traffic to be routed through a home router with port forwarding. The benefit of Cloudflare Tunnels is that your home IP address and ports are not exposed to the internet.
This is made possible because of cloudflared - a Cloudflare daemon that is installed on the machine in your home network that you want to access from the internet. The cloudflared creates an outbound-only connection to Cloudflare servers which then handle the incoming requests from the internet.
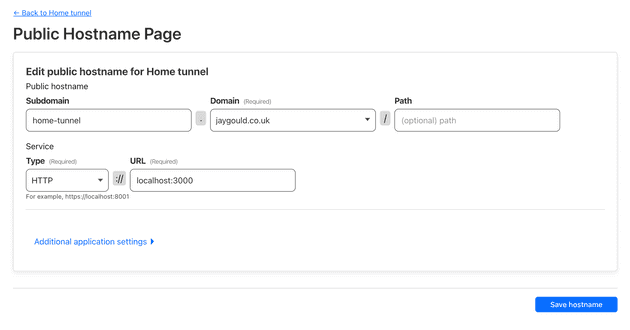
You can set up a tunnel via the CLI or via the Cloudflare dashboard. For the sake of this post I have created one using the dashboard:
This will ensure that when a user hits https://home-tunnel.jaygould.co.uk, the Cloudflare Tunnel will route the request through the tunnel to the host machine, to the host machine’s internal hostname and port.
The DNS records of https://home-tunnel.jaygould.co.uk point to Cloudflare instead of my home IP address, so the request isn’t tied to my home network directly.
Cloudflare Tunnels with Docker
When following the above configuration you may notice it doesn’t work when tunneling to an app running in a Docker container. This happens when the tunnel is pointing to a localhost address such as http://localhost:3000, but if cloudflared is installed in a Docker container, the host address needs to be relative to the Docker container. The localhost address in the context of cloudflared would refer to the local container. This will cause the following error:
error="Unable to reach the origin service. The service may be down or it may not be responding to traffic from cloudflared: dial tcp 127.0.0.1:3020: connect: connection refused" <redacted> event=1 ingressRule=0 originService=http://localhost:3020Accessing the application using the Docker hostname like http://my-app:3020 also wouldn’t work because the two containers were not on the same Docker network. My solution in the end was to move the Cloudflare tunnel config to my app’s Docker Compose file:
version: "3.8"
services:
  app-client:
    build:
      context: ./client
      dockerfile: ./Dockerfile.local
    environment:
      NODE_ENV: development
    ports:
      - 3020:3000
  ping-api:
    build:
      context: ./api
      dockerfile: ./Dockerfile.local
    environment:
      NODE_ENV: development
    ports:
      - 8080:8080
  ping-db:
    image: postgres
    environment:
      - POSTGRES_USER=user
    ports:
      - 2345:5432
  tunnel:
    container_name: cloudflared-tunnel
    image: cloudflare/cloudflared
    restart: unless-stopped
    command: tunnel run
    env_file:
      - ./client/.env
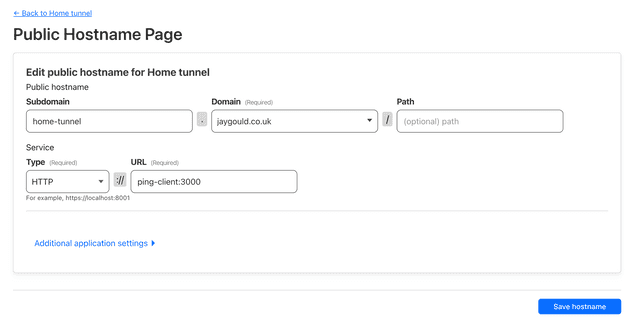
By adding the tunnel service to the same network as my app, the connection to my app client can be made by setting Cloudflare to point to my app’s Docker service name http://app-client:3000:
This will ensure that my local app is accessible via my URL https://home-tunnel.jaygould.co.uk. Creating the tunnel has automatically created a CNAME DNS record for my jaygould.co.uk domain.
The above solution covers how my application is exposed to the internet whilst running on Docker Compose, but I tend to only use Docker Compose during development and testing. A production setup requires something a little more robust, especially on a Raspberry Pi. My next post will cover my “production” solution for self hosting.
Senior Engineer at Haven


