Accessing a Raspberry Pi on a virtual desktop connection with VNC
December 04, 2023
Image source: a wonderful creation by Dall-E
This brief post shows how to remotely access a Raspberry Pi with a virtual desktop connection using VNC. VNC stands for Virtual Network Computing, and is a platform independent system used to control the mouse and keyboard of another machine. This can be helpful when controlling a Raspberry Pi, as the Pi is well suited to be controlled without a monitor. Taking into account it’s small footprint, it can be stored away in somewhere with nothing but a power connection.
First, a word about TeamViewer
When I first started experimenting with my Raspberry Pi 4, I was using TeamViewer to remotely control the device from inside and outside of my local network. This worked really well for the most part, but since I had my Raspberry Pi 5 delivered in November 2023, I couldn’t get the same seamless setup to work. I don’t know if it was because of the Raspberry Pi 5 itself, or a recent update to the TeamViewer software, but there was a cascade of issues that stopped me from using TeamViewer.
I looked into a few alternatives and landed on VNC which I think works great, and it’s something I prefer over TeamViewer.
Preparing the Raspberry Pi for remote access
You won’t be able to access the Pi using VNC right way. Instead, you should plug the Raspberry Pi into a monitor via HDMI, and use a keyboard and mouse to begin the setup.
First you should enable the VNC service on the Pi. Go to Menu > Preferences > Raspberry Pi Configuration. Then select the “Interfaces” tab. From here, you should see a list of interfaces (most of which are disabled by default):
You should enable to the VNC and SSH interfaces.
Then, you need to get the Raspberry Pi’s local network IP address which will be used later to SSH into it.
On the Pi in the CLI, run:
hostname -IThis will show you the Pi’s local IP address. Mine is 192.168.1.152, so that’s what I’ll be using for this post. From here, you will be able to SSH into the Pi to do the rest of the work.
Setting up VNC on the Raspberry Pi
With SSH and VNC enabled, you can begin.
Start by accessing the Pi with SSH:
When presented with the password prompt, enter the Pi’s password.
Note that I am accessing with the username
raspberrypi. You should replace this with what ever the username of the Pi is when you set it up.
Installing VNC on the Pi
Now you have SSH access, go ahead and install realvnc:
sudo apt-get install realvnc-vnc-server realvnc-vnc-viewerInstalling VNC Viewer
With the Raspberry Pi stil connected to the monitor via HDMI, and the VNC setup on the Pi side, you can then install the VNC client application on a different machine, such as your Mac or Windows machine. Head to the VNC website to download and install.
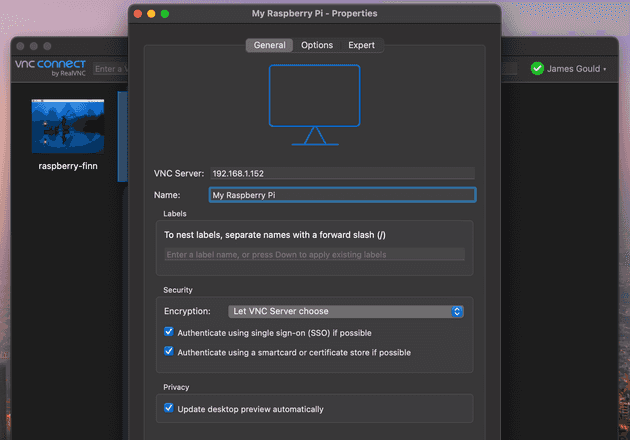
Once installed, you can use the client to access the Raspberry Pi using the local network IP address:
This will enable you to open a remote desktop view:
This will only work when the Pi is connected to a monitor though.
Accessing VNC remote desktop without a monitor
Most of the time you might not want to have the Pi attached to a monitor. The VNC application uses the monitor settings by default to set the resolution and other configuration to the VNC connection. This means that in order to connect to the Pi without a monitor connected to the Pi, you should set up a “virtual desktop”.
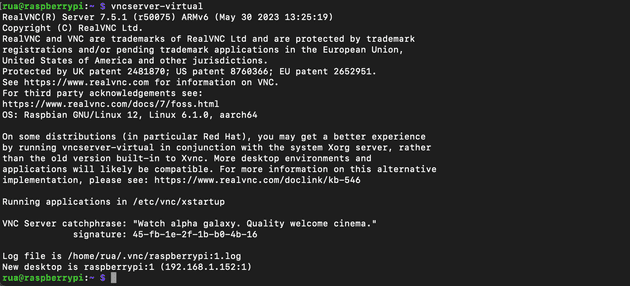
To do this, unplug your Raspberry Pi from the monitor, SSH into the Pi, and run:
vncserver-virtualThis will initiate a virtual desktop connection:
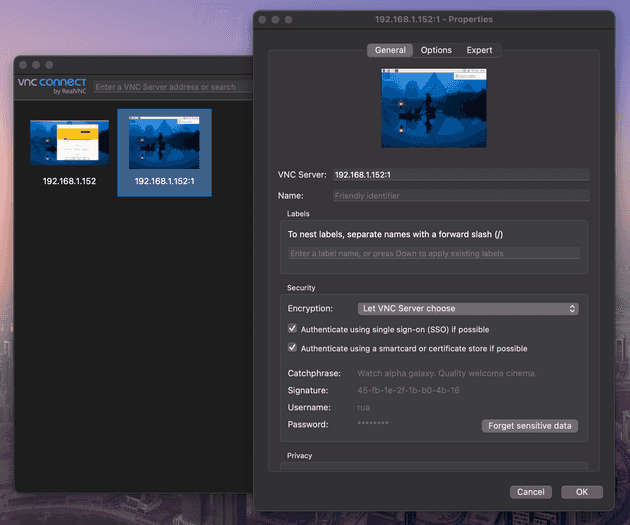
You can see in the above screenshot that the virtual desktop has been opened on 192.168.1.152:1. So back on your other machine in the VNC Viewer application, you can enter that address:
And the VNC connection is opened.
A note that this VNC connection is temporary, and when your Pi is restarted, the same
vnc-virtualcommand needs to be ran again for further connections to be made.
Troubleshooting
If installing on the Raspberry Pi OS 32bit, you may see an error such as the following when attempting to run vnc-virtual:
/usr/bin/vncserver-x11-core: error while loading shared libraries: libmmal.so: cannot open shared object file: No such file or directoryThanks to this useful GitHub issue, you can easily install the missing dependencies to get the VNC software:
mkdir ~/delete_after_move /
cd ~/delete_after_move /
wget -nv https://github.com/raspberrypi/firmware/raw/master/opt/vc/lib/libbcm_host.so /
wget -nv https://github.com/raspberrypi/firmware/raw/master/opt/vc/lib/libvcos.so /
wget -nv https://github.com/raspberrypi/firmware/raw/master/opt/vc/lib/libmmal.so /
wget -nv https://github.com/raspberrypi/firmware/raw/master/opt/vc/lib/libmmal_core.so /
wget -nv https://github.com/raspberrypi/firmware/raw/master/opt/vc/lib/libmmal_components.so /
wget -nv https://github.com/raspberrypi/firmware/raw/master/opt/vc/lib/libmmal_util.so /
wget -nv https://github.com/raspberrypi/firmware/raw/master/opt/vc/lib/libmmal_vc_client.so /
wget -nv https://github.com/raspberrypi/firmware/raw/master/opt/vc/lib/libvchiq_arm.so /
wget -nv https://github.com/raspberrypi/firmware/raw/master/opt/vc/lib/libvcsm.so /
wget -nv https://github.com/raspberrypi/firmware/raw/master/opt/vc/lib/libcontainers.so /
sudo mv ~/delete_after_move/*.so /usr/lib/
cd .. /
rmdir ~/delete_after_move /
sudo systemctl restart vncserver-x11-serviced.service
Senior Engineer at Haven


