Setting up Kubernetes on AWS EC2 instances without EKS
March 01, 2023
Image source: a wonderful creation by Dall-E
In my previous post I gave an overview of how to get a basic Kubernetes setup working on a local machine using Minikube. While this is a good method for learning and local development, it’s not suited for cloud based and production ready environments. This post will cover setting up Kubernetes on a cloud based AWS environment, managing multiple clusters, and pointing a domain name to a service within your cluster, with and without a load balancer.
Options for setting up Kubernetes in a cloud environment
Getting a fully working Kubernetes cluster set up without the use of third party tools and scripts looks very long-winded and challenging. There are resources out there to help do it, such as Kubernetes The Hard Way, but it seems like something that would only be worth doing if you wanted to learn everything about K8s, or perhaps wanted more control.
After discussing with K8s pro’s and reading online, it sounds like most people opt for a Kubernetes managed service - at least in a production level environment, as managed services take a lot of the time and effort away. Some popular managed services are Amazon EKS and Google GKE, and while they would be my preferred option if I was deciding on it for a business need, they were a little too expensive for my small side-project which doesn’t get a load of traffic.
Using kOps instead of a managed service
Setting up completely from scratch is a hugh amount of time and effort, and using a managed service (for my current needs anyway) is a little too expensive, but kOps is a nice middle ground that I proceeded to use for my side project.
kOps (short for Kubernetes Operations) is a tool which sets up a Kubernetes cluster for you using their own scripts. Rather than having to decide on and provision your own EC2 instance, set up a load balancer etc, kOps does it all for you programmatically. You end up with a fully working Kubernetes cluster but it’s done “manually” by kOps rather than being fully managed by Amazon EKS. This was a great option because I was able to see all the working parts in my AWS account which were provisioned automatically by kOps.
Getting started with kOps
I managed to get my basic K8s cluster set up within about 10 minutes by following the guide over at the kOps site. Although kOps allows you to chose between AWS, GKE, and a bunch of other providers, I went with AWS as I was more familiar with their products.
I won’t regurgitate the setup as they do a brilliant job of taking you through each step on their Getting Started section, but the one thing I did differently was specify a smaller node size when creating the cluster:
kops create cluster \
    --name=${NAME} \
    --cloud=aws \
    --zones=eu-west-2a \
		--node-size=t2.small \
		--master-size=t3.small
By default kOps was provisioning a t3.medium for both master node and the child node, but this seemed an overkill for me so I reduced as shown above.
A note on configuring AWS
In the kOps setup guide there’s references to exporting AWS credentials by exporting the values to the current CLI session, with export AWS_ACCESS_KEY_ID and export AWS_SECRET_ACCESS_KEY. This works for getting set up initially, but I’d encourage you to use AWS configuration files when managing your Kubernetes cluster day-to-day as they are useful if you have multiple AWS accounts (work and personal for example). The AWS docs are helpful for a full run down of how to set up AWS config. Briefly:
# ~/.aws/credentials

[default]
aws_access_key_id = xxx
aws_secret_access_key = xxx

[kops]
aws_access_key_id = xxx
aws_secret_access_key = xxx

# ~/.aws/config

[default]
region=us-west-2
output=json

[kops]
region=eu-west-2
output=json
Once configured in these files, you’ll need to run export AWS_PROFILE=kops before interacting with kops and kubectl on a new CLI instance.
Switching Kubernetes contexts
It’s likely you’ll have multiple Kubernetes clusters to manage - for example if you have a personal and work clusters, or if you’ve followed my previous post you may have access to a local Minikube cluster. As all commands to interface with your K8s clusters use the kubectl (or k9s) commands, you’ll need to switch contexts to point at your desired K8s location.
You can see all contexts which you currently have added to your machine with:
kubectl config get-contextsThis will output something like:
Then you can switch contexts with kubectl config use-context [context name]. In my case, my kOps managed system is devops.cinepicks.io, so to switch to point my kubectl at my kOps system, I would run:
kubectl config use-context devops.cinepicks.ioInteracting with kOps instance using kubectl
While the kops command is used to manage the top level cluster configuration by provisioning new compute instances, you’ll still want to use the standard kubectl command to interact with Kubernetes to perform lower level tasks like creating deployments and managing at a pod level.
To use kubectl with kOps, you’ll need to use a kOps command to gain access:
kops export kubecfg --admin --state s3://[state-store-url]This will use your AWS profile to access your config details in the state store and provide access, which lasts 18 hours. You’ll need to renew access again after that time.
If you encounter the error: “error: You must be logged n to the server (Unauthorized)”
I came across this issue when first setting up my kOps instance and trying to use kubectl, and it took me ages to figure out the solution. I was receiving the error:
error: You must be logged n to the server (Unauthorized)I was seeing this error because I’d installed Minikube after I installed kOps, so my ~/.zshrc file contained an alias which pointed the command kubectl to minikube kubectl. This meant that each time I was using the kubectl command, I was expecting it to be pointing at my kOps system but it was instead pointing to my local Minikube instance.
To fix this, simply remove the alias from your ~/.zshrc.
Summary of steps to interact with a kOps instance each time
So in summary, here are the commands which need to be ran each time you want to manage an existing kOps instance:
# Switch to your desired k8s context
kubectl config use-context [your-k8s-context]

# export your linked AWS profile
export AWS_PROFILE=[your-aws-profile]

# gain kubectl access via kOps
kops export kubecfg --admin --state s3://[state-store-url]
Communicating with pods on the AWS based Kubernetes cluster
Now we have a setup working on AWS EC2 instances, we can execute similar commands to the ones discussed in my last post. First we can start by deploying the Nginx and Postgres deployments from my pervious post to the new cloud based K8s setup. Here are the config files again:
# k8s/server.yaml

apiVersion: apps/v1
kind: Deployment
metadata:
  name: a-nginx-deployment
spec:
  selector:
    matchLabels:
      app: nginx
  replicas: 2 # tells deployment to run 2 replica pods
  template:
    metadata:
      labels:
        app: nginx
    spec:
      containers:
      - name: nginx
        image: nginx:1.14.2
        ports:
        - containerPort: 80
---
apiVersion: v1
kind: Service
metadata:
  name: a-nginx-service
  namespace: default
spec:
  type: NodePort
  selector:
    app: nginx
  ports:
    - port: 80
      name: http
---
# k8s/postgres.yaml

apiVersion: apps/v1
kind: Deployment
metadata:
  name: a-postgres-deployment
  namespace: default
spec:
  replicas: 1
  selector:
    matchLabels:
      app: postgres-db
  template:
    metadata:
      labels:
        app: postgres-db
    spec:
      containers:
      - name: postgres
        image: postgres:10.1
        ports:
          - containerPort: 5432
        env:
          - name: POSTGRES_DB
            value: db
          - name: POSTGRES_USER
            value: user
          - name: POSTGRES_PASSWORD
            value: password
          - name: POSTGRES_HOST_AUTH_METHOD
            value: trust
---
apiVersion: v1
kind: Service
metadata:
  name: a-postgres-db-service
  labels:
    app: postgres-db-service
spec:
  selector:
    app: postgres-db
  ports:
    - port: 2345
      protocol: TCP
      targetPort: 5432
Now with the right context selected and everything ready from the previous section above, apply the config files to the new AWS-based K8s cluster:
kubectl apply -f ./k8sRunning the
kubectl applycommand on a directory applies all files inside the directory.
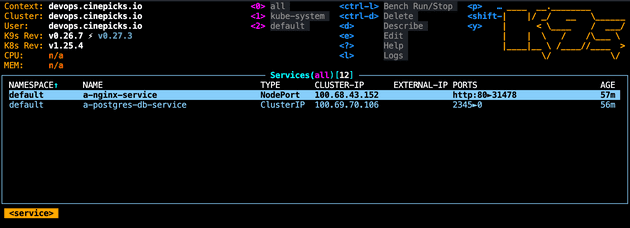
As discussed in the last post, you can use k9s to view the configuration. Simply run k9s, and you should see the pods, services etc:
Connecting to a pod on a K8s from outside cluster
In the last post I described how to view the Nginx server homepage in a browser using NodePort, on Minikube. This can be done on the AWS cluster too. Simply:
- Find the Elastic IP address of the
nodes-xxxxxEC2 instance in your AWS dashboard (as an example lets say my IP address is19.184.231.266). - Find the NodePort that is exposed from the Nginx service (the example above shows the NodePort as
31478). - AWS EC2 instances are really locked down by default, so update your EC2 security group to allow traffic in to the NodePort which is exposed by the Nginx service (
31478).
Then in a web browser, visit http://19.184.231.266:31478 and you should be able to see the Nginx page!
Another solution I also mentioned in the last post was using Port Forwarding. This can also be implemented to access a pod from your machine - just run kubectl port-forward svc/a-nginx-service 8080:80 and then you’ll be able to access the Nginx page with http://localhost:8080.
These methods are obviously not yet a production ready solution. You don’t want your web app to be accessed by IP address as these IP’s change frequently, and you also don’t want a weird long port number at the end. This method is great for debugging and development though.
Accessing the Nginx deployment with a URL (and no port numbers!)
There are a couple of ways I have configured my K8s cluster to be accessed by a domain name.
Using a Load Balancer
Probably the most common way to access a cluster with a domain is by using a service of type Load Balancer. Where a NodePort exposes a port from inside a node, a Load Balancer sits outside the cluster and directs traffic to pods attached the deployment which the Load Balancer service points to.
# k8s/server.yaml

apiVersion: apps/v1
kind: Deployment
metadata:
  name: a-nginx-deployment
spec:
  selector:
    matchLabels:
      app: nginx
  replicas: 2 # tells deployment to run 2 replica pods
  template:
    metadata:
      labels:
        app: nginx
    spec:
      containers:
      - name: nginx
        image: nginx:1.14.2
        ports:
        - containerPort: 80
---
apiVersion: v1
kind: Service
metadata:
  name: a-nginx-service
  namespace: default
spec:
  type: LoadBalancer # update to use a load balancer
  selector:
    app: nginx
  ports:
    - port: 80
      name: http
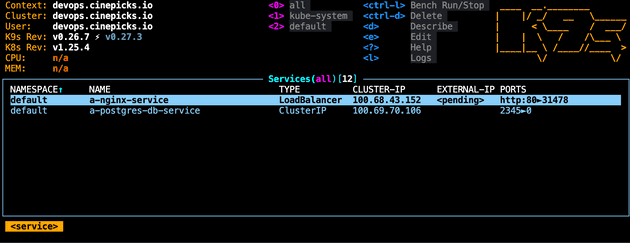
With this configured and applied with kubectl apply -f ./k8s, Kubernetes will instruct AWS to provision a Load Balancer which will be assigned an elastic IP address:
When the EXTERNAL-IP changes from pending to the IP address, you’ll then be able to access the IP address and view the Nginx page. If you have 4 replica pods for example, AWS Load Balancer will be in control of directing traffic to the pods. Accessing via an IP address is less than ideal of course. At this point you could point your DNS record to the IP address of the Load Balancer, but there’s no application level routing involved, and it’s far from a production ready solution.
Let’s say you have 3 different API deployments in your cluster, each with their own service which have a LoadBalancer type. This will cause K8s to provision 3 different Load Balancers on AWS, which is less than ideal for some situations. To address this, we can use an Ingress.
Using an Ingress
Ingress resources are used instead of creating a Load Balancer service type, but perform many of the same operations as a load balancer, and by default setting up an Ingress resource will actually provision a load balancer for you. The load balancer created by an Ingress resource has the advantage of being able to point to multiple Ingress resources, and therefore multiple services, meaning only a single load balancer is created. There’s a great article here which lays out the difference between Ingress Resources and Load Balancer Service types.
To set up Ingress, you’ll need to do two things:
- Create Kubernetes config for an Ingress resource in a config file
- Install an Ingress controller on the cluster
To set up an Ingress resource, update the server config to include the resource:
# k8s/server.yaml

apiVersion: apps/v1
kind: Deployment
metadata:
  name: a-nginx-deployment
spec:
  selector:
    matchLabels:
      app: nginx
  replicas: 2
  template:
    metadata:
      labels:
        app: nginx
    spec:
      containers:
      - name: nginx
        image: nginx:1.14.2
        ports:
        - containerPort: 80
---
apiVersion: v1
kind: Service
metadata:
  name: a-nginx-service
  namespace: default
spec:
  selector:
    # note how we've removed the LoadBalancer type as the Ingress will create it for us now
    app: nginx
  ports:
    - port: 80
      name: http
---
apiVersion: networking.k8s.io/v1
kind: Ingress
metadata:
  name: a-ingress-entrypoint
spec:
  ingressClassName: nginx
  rules:
  - host: my-domain.com
    http:
      paths:
      - pathType: Prefix
        path: "/"
        backend:
          service:
            name: a-nginx-service
            port:
              number: 80
Then you’ll need to install the Ingress Controller. There are many different Ingress Controllers available from various vendors. I believe the most popular one is ingress-nginx which can be found here. Follow the install guide there to install the controller.
To find out your cluster’s Ingress setup during setup or afterwards, you can run kubectl get ingressclass -A -o yaml to see the Ingress Controller information. This is helpful to find the IngressClassName which is required as a parameter in the Ingress resource in the snippet above.
Also, using k9s you can look for :ingress to see the various Ingress setups on your cluster.
There are two popular Nginx Ingress Controllers - one managed by Kubernetes and one managed by Nginx themselves. This was confusing at first for me, but it’s important to know the difference when Googling around and debugging setup issues. I am recommending to use the Kubernetes one in the link above.
Another thing to note is that the fact there is an Nginx based Ingress Controller has nothing to do with me setting up an Nginx server in the examples in this post. That’s just a coincidence, and using an Nginx Ingress Controller can be used for all application types.
The final step is to update your domain name A record to point to the elastic IP address assigned to the Load Balancer, or IP address created by the Ingress Controller, and after a few minutes your domain name will point directly to the Nginx page.
Load Balancers are expensive for side projects, but there’s a way to configure without a load balancer
Although Load Balancers are pretty much one of the best ways to manage external access to a cluster (because it’s what they are designed to do), they come with a cost of around £15 - £20 per month. Of course, this cost wouldn’t be a problem for a production level setup for a business - in fact large systems could have multiple Load Balancers. However, as mentioned previously, I was interesting in setting up my cluster for a small side project.
I tried to find ways to get the same domain level access to my API server inside my cluster without using a Load Balancer, and it took a while but I found a pretty neat solution. I had to sift through a few other suggestions in the community first, such as using MetalLB and hostNetwork: true solutions as described in SO posts like this, but the solution I landed on was outlined brilliantly in this post: save money and skip the kubernetes load balancer.
Senior Engineer at Haven


