Learn Kubernetes locally with communication between pods
February 23, 2023
Image source: a wonderful creation by Dall-E
This series of posts will explain what Kubernetes is, and outline the process for getting Kubernetes running in both a local environment, and in a production ready cloud based environment.
What is Kubernetes
Kubernetes, often referred to as K8s, is a system for managing and deploying containerised applications. It excels at allowing easy and efficient deployments, scaling on the fly, and ultra high availability with the use of replicated “nodes”.
Imagine a non-containerised application where you may have an API server and a database server in separate remote locations. With a simple setup you may only have one API server running, and if that crashes it will cause your application to fall down.
With K8s, your API server and database server run in pods within a cluster. You can configure K8s to run two or more pods to split traffic load and provide redundancy, providing a highly reliable setup with little effort (once set up correctly).
When not to use Kubernetes
Kubernetes is excellent for managing a large set of systems which are hosted on different machines and communicate between each other, but I’m of the opinion that K8s is really more suited for medium to large sized systems, and that K8s would be overkill for smaller, low traffic/low risk systems.
I have a small side-project web server called Cinepicks which feeds a mobile app. I moved the API over the the new setup when I was first learning K8s, and I discovered that getting to run in a production environment at a real basic level requires a fair amount of cost (both financial and effort) compared to a small, side-project setup I was running before.
I proceeded to set up K8s for Cinepicks which at time of writing is costing about £60/month, which includes:
- 2 object storage volumes (not buckets)
- 2 t3.small EC2 instances
- 1 load balancer
- 1 elastic IP
As you can see, there’s a lot going on for what is a couple of API servers with low traffic. For this reason, once I had a fun couple of weeks learning features of K8s in production, I decided to revert to my previous setup which was less than a fifth of the price to run that Kubernetes.
With all that in mind, I’d still recommend trying out Kubernetes in a cloud environment for a short time if you’re looking to get started, as it’s great practice.
Getting started and the basics
First you’ll want to install some dependencies:
- Start by installing Docker if not already installed.
- Then installing Minikube with
brew install minikube.
Minikube is an system which manages a Kubernetes environment that can be used to run a local machine for development purposes. This is good for playing around with K8s functionality without deploying to your remote environment.
Later I’ll cover running K8s in a production environment with kOps, but initially it’s much easier to understand Kubernetes running locally. It’s easier because Minikube abstracts a lot of the complex setup away into an easy application.
- Then run
minikube start. Once loaded, your local K8s system is ready to be interacted with. You’ll need to runminikube starteach time you start your machine.
An important note is that all commands to interact with your K8s cluster are done with kubectl. For example:
kubectl create deployment hello-world --image=paulbouwer/hello-kubernetes:1.0
kubectl expose deployment hello-world --type=NodePort --port=8080
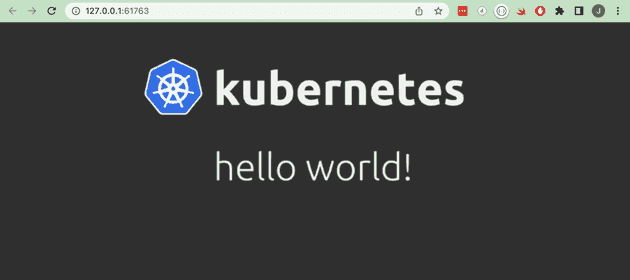
The above creates a deployment called hello-world using an image from Docker Hub (paulbouwer/hello-kubernetes). This deployment is not accessible (inside or outside of the cluster) by default, so we expose it with the second command. Once exposed, we can instruct Minikube to allow us to access that service with minikube service hello-world. This command provides access to the newly exposed deployment, allowing us to see it in browser:
At this point we have created a deployment which consists of a single pod and that pod is running a container. The kubectl command can be used to show what resources are running and their states, for example we can see a list of all deployments with kubectl get deployments, and kubectl get pods to get a list of all pods.
The terminology was confusing for me when I started learning, but there is a way to visualise everything much easier.
Navigating K8s clusters easier with k9s CLI tool
The above examples show the most basic implementation of Kubernetes you can probably get, but there’s still a fair amount of parts connecting together in the cluster which was difficult to visualise for me as a beginner. One great tool to help navigate Kubernetes is k9s.
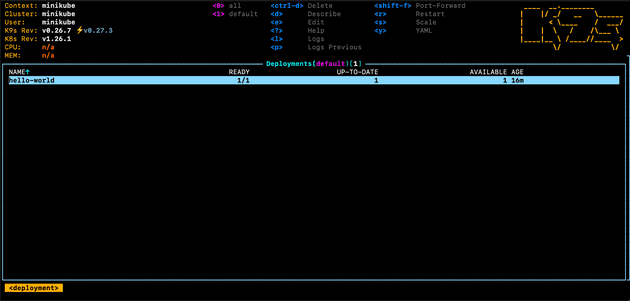
Once installed, you can simply run the command k9s which will show you a nice looking UI:
You use the arrow and enter keys to navigate around the cluster. For example, in the screenshot above you can see we’re viewing Deployments, and the single deployment in that list is the one we created earlier. Pressing enter on that deployment will take you to the pod view, then pressing again you will see the container, and pressing again will show you the container process, which will be the logs in most cases.
When I’m accessing my Kubernetes resources day-to-day, I will almost never use
kubectlcommand directly. I always usek9s. When accessing your cluster with k9s, it will usekubectlunder the hood.
Using config files
Earlier we used the kubectl create deployment command to create a hello world cluster. When using Kubernetes outside of a learning environment though, it’s best practice to use files to configure everything relating to your cluster. This gives the following benefits:
- Config files are easier to read as they often contain a lot of information on how to configure a deployment, service etc, so are much more suited to a file.
- The files can also be added to version control, allowing consistency and reliability.
- As the files are in version control, it’s easier for collaboration with other team members.
Simple config file for K8s deployment
To begin with, run k9s and delete all existing deployments and services if you have any.
Then lets start with a simple config file:
# k8s/server.yaml

apiVersion: apps/v1
kind: Deployment
metadata:
  name: nginx-deployment
spec:
  selector:
    matchLabels:
      app: nginx
  replicas: 2 # tells deployment to run 2 replica pods
  template:
    metadata:
      labels:
        app: nginx
    spec:
      containers:
      - name: nginx
        image: nginx:1.14.2
        ports:
        - containerPort: 80
---
apiVersion: v1
kind: Service
metadata:
  name: nginx-service
  namespace: default
spec:
  selector:
    app: nginx # must match the matchLabels > app value in the deployment above
  ports:
    - port: 80
      name: http
This file, k8s/server.yaml can be placed anywhere that you can access with your terminal. I add mine in a /k8s directory in my project root. Once ready, apply the deployment to your Minikube cluster:
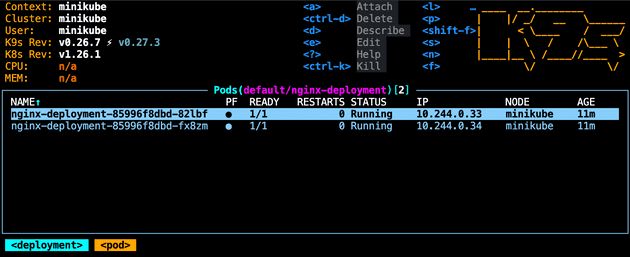
kubectl apply -f ./k8s/server.yaml This will use the config in the file and apply it to your Minikube cluster. Run k9s and you will be able to see the nginx-deployment deployment. Enter the deployment and you’ll see that we’re now running two replica pods of that deployment (which was configured with replicas: 2 in the yaml above):
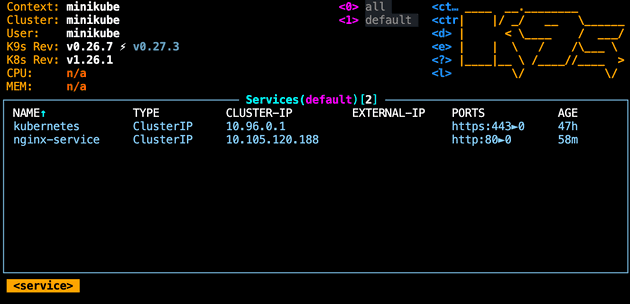
You can also navigate to :services and view the service we create in the config file:
We have specified containerPort: 80 in the config, but this means that each of the two replica pods use expose Nginx on port 80 inside the cluster, and does not mean that we can access on port 80 from outside the cluster. I’ll go into more detail about communication between pods and from outside of the cluster later in more detail.
Kubernetes terminology - containers vs pods vs deployments vs nodes
Now a few more of the key concepts are covered, and you have access to k9s to allow easier visualisation of the cluster we just created, I’ll do a run through of some of the keywords and what they mean.
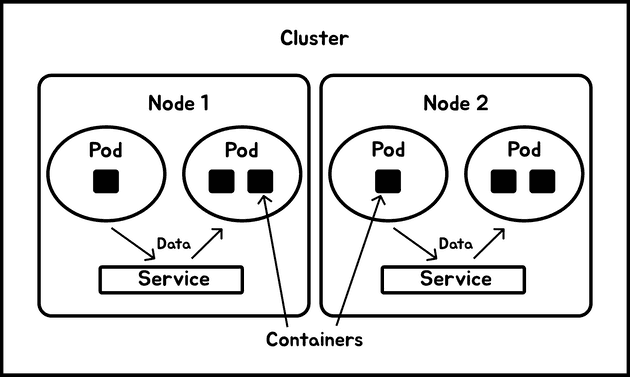
- Containers are the smallest parts of a K8s system. They are not specific to Kubernetes - you may have used containers before with Docker for example. They represent a separate instance of one part your application. A container can be something like Nginx, or Elastic, or even your own private container for your application (more on that later).
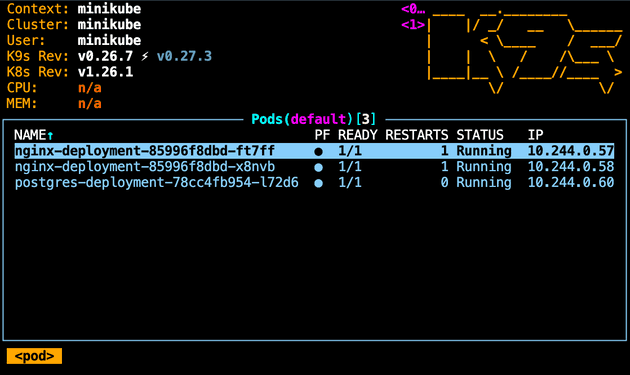
- Pods encapsulate one or more containers, although I think they should contain as little containers as possible for efficiency. As shown in the screen shot earlier, each pod contains it’s own local network, and also it’s own IP address within the cluster. Pods are used as a unit of replication, and in our Nginx application above we configured two pods for our Nginx deployment.
- Deployments maintain a set of pods, and are a level of abstraction above pods. Rather than working with pods directly, we’re able to configure deployments to specify things like replica count (as we did earlier in our Nginx example), and which containers to use.
- Nodes are the smallest level of computing resources in your cluster, and a further level of abstraction above deployments. In our example earlier we are running on our local Minikube, which only runs on a single node. In a production environment though, you’ll almost certainly have at least two nodes - a master node which contains the Kubernetes core working systems, and one or more nodes which contain your application deployments. You can configure nodes manually, but most K8s management systems (like Minikube or kOps, which I’ll cover later) handle node management for you.
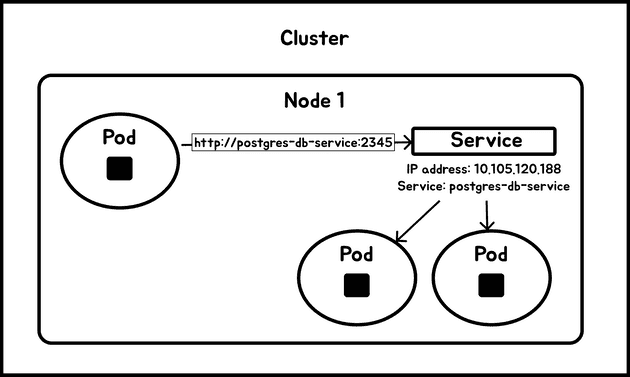
- Services provide a way to allow parts of your application to communicate within the same cluster. Taking our
k8s/server.yamlfrom earlier, if we were to deploy this without the service at the bottom of the config file, we would have Nginx running on two pods, but the pods would not be able to communicate with anything inside or outside the cluster. A service provides an abstraction above the pod level which enables communication, providing an IP address specific to the service which can be used to route traffic to pods.
Here’s a diagram to help visualise the different components:
Communication inside and outside of a cluster
So far we have a container running on a couple of replica pods, but there’s not much going on. In a real life system there could be many parts of a system such as other services, databases, front ends, etc. All of these deployments are likely to need to communicate with each other (inside the cluster), and some may need to be accessible outside the cluster.
To illustrate this, I’ll create a new deployment to include a simple Postgres database. Here’s a new config file:
# k8s/postgres.yaml

apiVersion: apps/v1
kind: Deployment
metadata:
  name: postgres-deployment
  namespace: default
spec:
  replicas: 1
  selector:
    matchLabels:
      app: postgres-db
  template:
    metadata:
      labels:
        app: postgres-db
    spec:
      containers:
      - name: postgres
        image: postgres:10.1
        ports:
          - containerPort: 5432
        env:
          - name: POSTGRES_DB
            value: db
          - name: POSTGRES_USER
            value: user
          - name: POSTGRES_PASSWORD
            value: password
          - name: POSTGRES_HOST_AUTH_METHOD
            value: trust
---
apiVersion: v1
kind: Service
metadata:
  name: postgres-db-service
  labels:
    app: postgres-db-service
spec:
  selector:
    app: postgres-db
  ports:
    - protocol: TCP
      port: 2345 # port accessible outside the pod
      targetPort: 5432 # port exposed from inside the pod
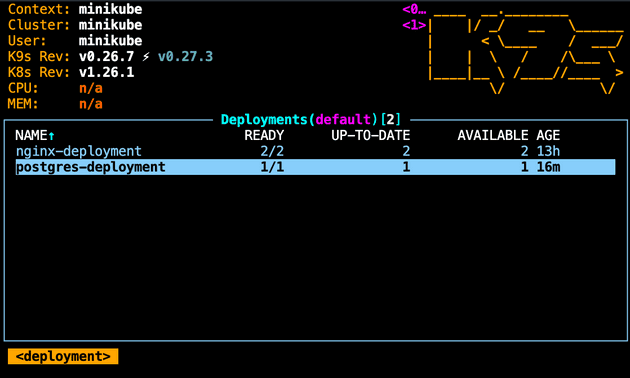
Similar to the deployment which created the Nginx server before, this config creates a deployment for a Postgres database, as well as a service to expose the database for communication. Confirm the setup with k9s:
This is a very common setup whereby an API service will communicate with a database on the same K8s cluster.
Communication inside a pod
To start with lets look at communication inside a pod. Start by getting shell access to an Nginx pod. Use k9s by highlighting a pod and pressing the s key. There’s of course a corresponding kubectl command but it requires first running another kubectl command to get the pod name, so it’s quicker and easier to use k9s.
Once you have shell access, install cURL:
apt update
apt install curl
And then make a cURL request to the Nginx server running on the pod:
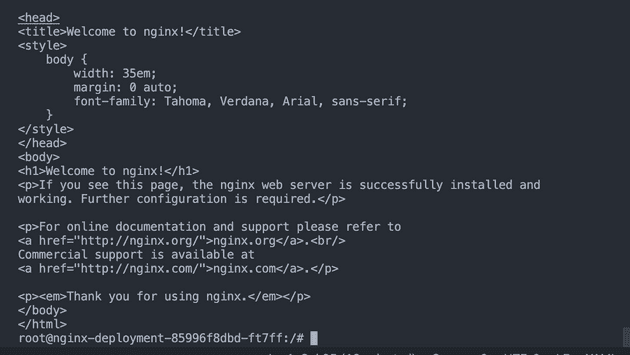
curl http://localhostThat will show the output of the Nginx page:
This works because we are making the request to the Nginx server which is installed on the pod we’re currently on, and a pod runs an isolated local network.
We know that the Postgres database is running on the same node as the Nginx server (because Minikube runs only one node), but on a different pod. So if we were to run curl http://localhost:5432 to send a request to the database, it won’t work as we need to be communicating to a different pod, and therefore a different network.
Communication between different pods on the same node
In the example we have so far with an API and a database as separate deployments (and separate pods), it’s likely the API will want to perform requests to update the database. As the two parts of the system are on different pods, they are not on the same local network, so we need to configure Kubernetes to allow the pods to communicate.
You could shell into a pod and make a request to another pod via the other pod’s IP address. For example:
If we shelled into the Postgres pod, we could send a simple HTTP cURL to http://10.244.0.57 which would return the Nginx page HTML. However, this is not a good solution because once a pod restarts or is moved to another node, it is likely to change IP address. Also, if you have multiple pods you don’t want to be sending all traffic to a single IP address. To address this, you can use a Service.
A service is used to facilitate communication between pods. In our example config above, we’re attaching our postgres-db-service service to our postgres-deployment, linking them together with the use of the labels. Our label is app: postgres-db, which is assigned to the Postgres Deployment and Service.
I’ve configured the service to map ports in such a way that makes it easy to see what the port labels mean in the config file - for example targetPort: 5432 and port: 2345 means from outside of the pod, we will need to access the database with port 2345, and this will be mapped to the port of the database inside the postgres pod, which is the standard 5432.
With this setup on the Postgres config, inside the cluster we are directing traffic on port
2345(theportproperty) to port5432inside the pod (thetargetPortproperty) on any pods with theapplabel set topostgres-dbinside theselectorproperty.
With those entities linked together, we’re able to perform network requests using the name of the service. For example, we could shell into our Nginx container and run:
curl http://postgres-db-service:2345Although this will be communicating with the other pod, we will get an empty reply as Postgres will not have anything listening on HTTP protocol by default. Instead, a more useful command would be:
# first, install Postgres client
apt-get install -y postgresql-client

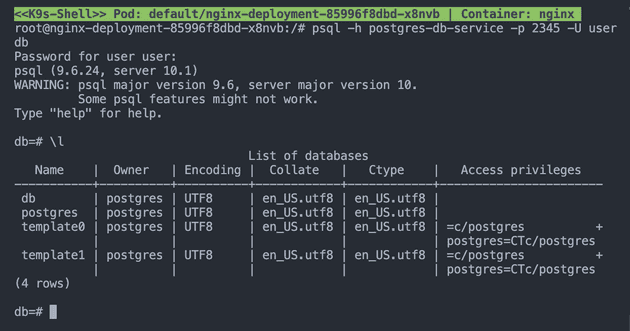
psql -h postgres-db-service -p 2345 -U user db
This uses
postgres-db-serviceas the host,2345as the port,useras the username, anddbas the database name. Note how these values are what we configured in thek8s/postgres.yamlfile for our database.
With that command executed, we have successfully sent a psql request to another pod, allowing us to perform a command such as \l to list the databases in the pod:
So in summary, pods can communicate within a cluster by:
- Assigning the deployment/pod a label in the config file (example above is
app: postgres-db) - Assign the service the same label in the
selectorfield - Make requests using the service
namefield (example above ispostgres-db-service) - i.e.http://postgres-db-service:2345
Accessing a pod from outside a cluster
Kubernetes is designed to be as safe as possible, and therefore doesn’t expose much outside of the cluster unless it’s configured to do so. There are a few ways to access a pod from outside of a cluster, and I’ll cover some of them briefly.
Accessing a pod with port forwarding
One way to access a pod from outside a cluster is with port forwarding, where we can set K8s to forward all traffic from a chosen port on our host machine to a port defined on a service. In our Nginx example, our nginx-servivce is running on port 80, so we can run:
kubectl port-forward svc/nginx-service 8080:80Then we can access the address http://127.0.0.1:8080 and see our Nginx page. This method is again only useful for debugging and development.
The port 8080 can be any port - it doesn’t need to be linked to any port inside the K8s environment. Only the port 80 needs to be used to access the port on the service.
Accessing a pod with NodePort
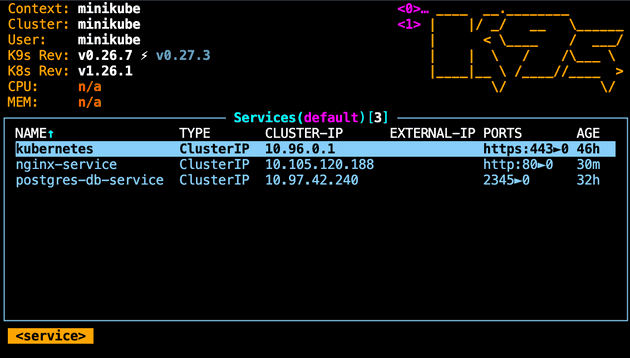
Earlier we created a service which enables communication to the Postgres pod, and by default this is of type ClusterIP. This can be confirmed using k9s:
A ClusterIP is a type of service that allow communication within a node only, and is the default type when creating a service. In order for us to access the pod outside of the cluster, we can implement a service which is of type NodePort.
Let’s leave the Postgres service as ClusterIP, but update the Nginx server to use a NodePort service, allowing us to access the Nginx page from a web browser outside the cluster:
# k8s/server.yaml

apiVersion: apps/v1
kind: Deployment
metadata:
  name: nginx-deployment
spec:
  selector:
    matchLabels:
      app: nginx
  replicas: 2
  template:
    metadata:
      labels:
        app: nginx
    spec:
      containers:
      - name: nginx
        image: nginx:1.14.2
        ports:
        - containerPort: 80
---
apiVersion: v1
kind: Service
metadata:
  name: nginx-service
  namespace: default
spec:
  type: NodePort # update to add NodePort type
  selector:
    app: nginx
  ports:
    - port: 80
      name: http
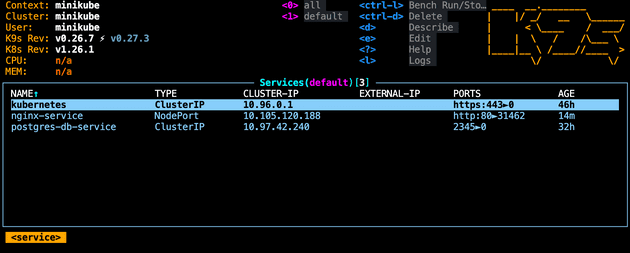
With this updated, we can confirm the change in k9s:
If we were on a cloud based K8s setup, we would now be able to access the Nginx page via the address http://[node-ip-address]:31462. The port 31462 here is the NodePort which is assigned by the service. NodePorts range is 30000-32767, and using NodePort type there’s no way to access inside the cluster without using this IP range. You wouldn’t see this in production because you don’t really want to be using NodePort services for a production setup. Instead, this method is best for debugging and development.
However, as we’re using Minikube and not using a cloud setup, we must run the command minikube service nginx-service as Minikube doesn’t support accessing without creating a Minikube tunnel.
Another service type is
LoadBalancer, which is more commonly used in cloud and production environments. I won’t cover this here as it will be best covered in the following post where I explain setting up in a cloud environment.
Thanks for reading - another post will follow which will move from a local setup to a cloud based setup on AWS.
Senior Engineer at Haven

