Connecting a React Native app to a local Node and debugging server
November 07, 2018
Looking back at when I first started hacking away at React Native apps, anything could be done using device simulators. iOS simulators are easy to set up as they come baked in to Xcode, and Android simulators were easy enough once I started using Genymotion. You’re able to test anything on the simulators, connect them to your local network, and swap the devices and models around to experience an application in different environments.
Once you start getting into serious app territory, the kind where you’re developing a real app for real people, you’ll want to have a testing environment at your fingertips that lets you test on real devices. Of course, you can create a production build of an app and add to a real device, but the ideal setup is to have your devices able to:
- Connect to the remote debugging server provided by React Native, helping you debug with the browser console.
- Connect to a local data server which holds your Node, or other back end OS.
They may seem like easy things to get set up, but if you don’t test on real devices that often, it can help to have all the steps in once place so you don’t need to Google around everywhere for explanations or tutorials.
iOS
Getting an app on your device for iOS is relatively easy (or at least it was for me). The official React Native docs mention that you need to open your React Native app in Xcode, select your device from Product > Destination, and that will auto-register your device.
This post assumes you already have an Apple Developer licence and your device registered to that licence account, so all being well, simply running your app on your device from Xcode or by running react-native run-ios in the terminal will open your app on the device.
The best part about this is that as long as your development machine and device are on the same local network (Wifi) as one another, you’ll automatically be able to use the remote debugging server, and connect to your local data servers also.
Thanks Apple.
Android
For me, Android was a little more complicated.
Connecting to a debugging server
The React Native debugger has the same standard URL for developing on a simulator and on a real device, which is http://localhost:8081/debugger-ui/. This is fine when accessing from a simulator because the localhost part of the URL is pointing to the machine you’re developing on, but it’s not the same for when using a real device. The setup with iOS bypasses this small issue.
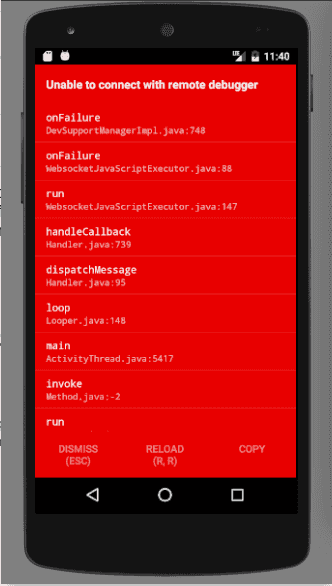
Instead, with Android, the real device needs to understand the machine’s port information in order to access the debugging instance on your machine. Now if you tried to access the remote debugger by giving your device a shake and selecting “Debug JS remotely”, you’ll get the following error:
This is because your device does not know which port the localhost is connecting to. As explained in the official docs, this can be fixed using the adb reverse command, which is a utility provided by Android’s SDK. The official docs ask you to find the device name:
$ adb devices
and then reversing the ports, providing the device name as a parameter:
$ adb -s <device name> reverse tcp:8081 tcp:8081
To help with some useful
adbcommands, I’ve added a mini cheat sheet below.
Also, be sure to close your app down and re-open in order for the
adbcommands to take effect.
This will enable you to connect to the debugging server.
In addition to this method, the official docs say you can use your local Wifi connection and add your machine’s IP address to the dev menu on your device, but the adb method is my preffered one.
Connecting to a data server
With many applications, you may also want to conenct to a local developemnt server for more rapid development, for example a Node JS server which is connected to via GraphQL or REST endpoints. Again, usually a trivial matter when working with simulators or on the web, but as the device is not on your localhost (machine), you need to use a similar approach as mentioned above.
You are able to use the adb reverse command as one solution, so if your Node server is running on the URL http://localhost:1137 for example, you’re able to run:
$ adb -s <device name> reverse tcp:1137 tcp:1137
and this will enable you to access that localhost development server if your device is plugged in to your machine.
Another solution to this, if your machine is on the same local Wifi network, is to access the server using the hosting device’s IP address directly. So in your app, instead of having http://localhost:1137/some-api/some-request being sent from your application, you can change it to http://[machine-ip-address]:1137/some-api/some-request, where your add in your machine’s local network IP address (found in Network preferences on a Mac).
Quick adb cheat sheet
If you get adb not found error
Edit your bash_profile by going to your Users/[$USER] directory, show all hidden files by pressing CMD + Shift + ., and ensuring the following entries exist:
export PATH=$PATH:/Users/Jay/Library/Android/sdk/platform-tools
export ANDROID_HOME=/Users/$USER/Library/Android/sdk
Then you’ll be able to run adb devices for example in any directory.
Removing all ADB reverses
adb reverse --remove-all
Removing specific ADB reverse
adb forward --remove tcp:8081
Senior Engineer at Haven


