My dev and deployment method using MAMP, GIT and Wordpress - Part 1
January 04, 2017
This post is to run through a solid, proven dev and deployment process using MAMP, Wordpress, Github and GIT repos on remote servers.
This is part 1 of the 2 part tutorial. Part 2 can be read here.
The web dev community is forever churning up the “next big thing” to help with the development of websites and apps with the likes of task runners, compilers, transpilers, prepilers, postpilers (ok I just made a few of them up) but one thing that hasn’t changed massively in the last 5 years or so is deployment. Which is great news for new developers as it’s one less thing to complicate things.
Back in the day, it was the done way to FTP websites up to the server using something like Dreamweaver and perhaps develop on your local machine in between, which was my workflow for far much longer than it should have been. In the last few years though I’ve been using Git to version and deploy my code - like the majority of people I guess, but I wanted to use this post to document my deployment methods as it can still be daunting for beginners. Especially when most of the tutorials out there, in my opinion, don’t go in to enough detail about the basics and assume you know a lot already.
Before I get into my workflow, I thought it best I mention that there are deployment methods out there which are newer and probably easier than this one by using tools such as FTPloy and Beanstalk. Beanstalk now supports Git hosting and integration, as does FTPloy, and they’re great if you’re not too confident with the command line with Git. They both have a nice and easy to use interface which will help do the job. However, as I was approaching this, you may also wish to explore something a little more “down to the metal” (and free) by getting stuck in with SSH, the command line etc to level up your skills.
So I’ll outline the workflow below:
- Set up your local development environment
- Set up your hosts file so your computer can use domain name style addresses instead of IP addresses
- Let MAMP (or other local server setup) know about your new hosts file change
- Set up two GIT repos on your server which will contain your website, and a staging website for showing your clients the progress of the site, or view updates before they’re pushed live
- Set up a repo on GitHub (or similar GIT hosting service) so you and your team have a central location to store your code
- Set up your Wordpress environment to handle multiple config files
Setting up your local environment
There are some great solutions out there for developing locally on your machine. Vagrant is a great tool to use for making it super easy to re-use and distribute local dev environments, as is Docker which is relatively new player in the game. These have slightly more complex setup processes, but I’ll cover these in another post at some point. As many people still use MAMP today, including myself most of the time, I’ll be using this in my example.
First, head to the MAMP website and download. If you have a Windows machine, go for the equivalent which is XAMPP or WAMP. The set up for MAMP is pretty straight-forward, so once finished, head to the htdocs folder which will store your websites. You’ll add another folder inside here for each of your websites.
To test and ensure MAMP has installed and works correctly, perhaps head over to HTML5boilerplate.com and drop that in a folder called mywebsite and run the site locally. Your site can then be accessed via http://localhost/mywebsite.
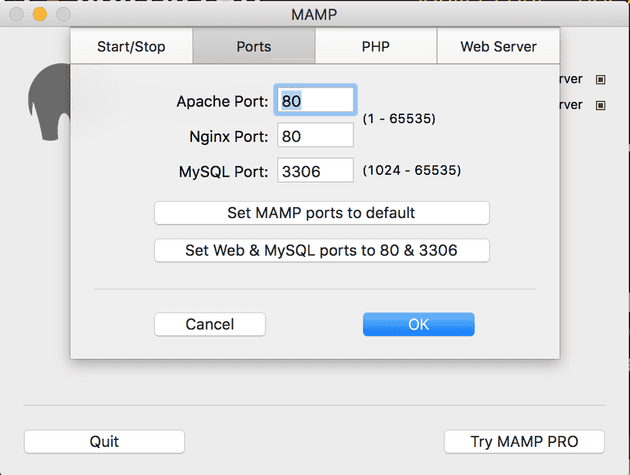
Just a quick note, MAMP often requires some configuring if the default ports are in use. By default, MAMP uses port 8888, which means your sites will be accessed via http://localhost:8888/mywebsite, but like me, you may wish to change this if there’s some sort of problem by clicking the button to set them to port 80, as shown in the below image:
Setting up your hosts file
As standard working with MAMP you’ll notice the websites are accessed via using http://localhost/mywebsite, or http://localhost:8888/mywebsite, but what we really want to do is set it up so your local environment so your local site is accessed by something like local.mywebsite.com. This helps a lot when it comes to organisation within your config files, databases, and it looks good too!
Firstly, open your terminal and type:
sudo nano /etc/hostsThis will open up the hosts file in the nano unix text editor. You’ll see some lines of code looking like:
127.0.0.1       localhost
255.255.255.255 broadcasthost
::1             localhost
This is what points your local IP address (127.0.0.1) to your localhost address in the web browser.
You’ll want to add in a new line to match with your site domain. For the purpose of the rest of this post, we’ll use mywebsite.com as your site. So, add the following line to your hosts file:
127.0.0.1 local.mywebsite.comGreat, now exit and save by pressing ctrl + x. As I mentioned at the start of this post, this is a great way of learning about getting a little closer to the metal when it comes to developing. You may wish to explore using the terminal if you aren’t too familiar. Perhaps use Vim which is another text editor. Anyway enough of this shit.
Let MAMP know about your updated hosts file
Now your computer knows how to interpret the new IP to domain mapping, it’s time to inform MAMP of the same change so they can work together. Again, this example is for MAMP, but there will be a very similar way to do the same thing on your local server setup, just ask Google.
Navigate to your MAMP apache configuration directory. Do this in your normal Mac finder, or Windows explorer, as these following 2 files are a probably best edited in your text editor for ease:
/Applications/MAMP/conf/apache/httpd.confOpen the file in Atom or your text editor of choice. This file contains quite a few lines of Apache configuration. Most of it you’ll never need to touch, so scroll past it all to around line 525 and remove the hash symbol from the Virtual Hosts configuration, so it looks something like this:
# Virtual Hosts
Include /Applications/MAMP/conf/apache/extra/httpd-vhosts.conf
Save the file, and navigate to the http-vhosts.conf file you just uncommented the includes for above. Again, open this in your text editor. You’ll see some dummy virtual host setups which give you a template in which to base your own on:
<VirtualHost *:80>
    ServerAdmin [email protected]
    DocumentRoot "/Applications/MAMP/Library/docs/dummy-host2.example.com"
    ServerName dummy-host2.example.com
    ErrorLog "logs/dummy-host2.example.com-error_log"
    CustomLog "logs/dummy-host2.example.com-access_log" common
</VirtualHost>
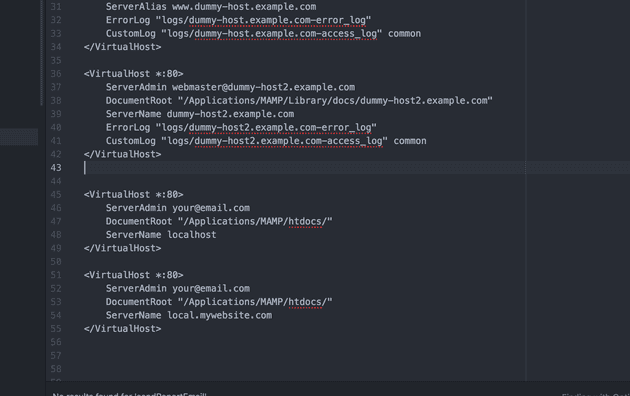
You add a VirtualHost tag, like above, for each website you want to link to the hosts file. In this example, we’ll add 2 of VirtualHost tags - one for the site in this example (mywebsite.com) and one to remain using your localhost address. See the image below:
You’ll notice there’s a ServerName localhost, and ServerName local.mywebsite.com. We are setting up the localhost ServerName in this image at the top of the two entries as this will mean you can still access websites in your htdocs folder using the http://localhost/ address in your browser.
And by the way - the localhost entry must come at the top of your list of VirtualHosts.
We’re almost there! Last thing to do is reset MAMP. Just turn the servers off and on again, visit http://local.mywebsite.com and see the wonderful HTML5 boilerplate, or some random stuff you decided to show to get your server tested.
And that’s it for part 1!
I’ll release part 2 soon, where we’ll cover the exciting part - getting your GIT deployment integrated into your sweet ass setup here.
Senior Engineer at Haven


